I hope everyone had a great Christmas yesterday. Just wanted to quickly post my Christmas nails from this year. I had these on since Saturday and was originally thinking I'd change them up either Tuesday or Wednesday night. But the cleaning, wrapping, and just general last minute preparations for Christmas kind of derailed that plan!
For my base, I started with two coats of Orly Au Champagne then topped that with one coat of Sonnetarium Snowfall. I used this same combination a few years ago as a base for a Christmas lights design, and had been wanting to use it again ever since. On my ring finger, I used a design from MoYou London Festive Collection plate 17, stamped with Konad Special Polish in red. I felt like it needed a little something else, so I used black Konad Special Polish and stamped a small music notes design from the same plate at my cuticle.
The ornaments all came from MoYou London Festive Collection plate 18. I used Konad Special Polishes in red, green, and blue for the ornaments, and also for dotting to fill up some of the blank space around the ornaments. Once the dots were completely dry, I topped everything with one coat of Seche Vite top coat.
Even though I ended up only doing one Christmas themed design this year, I didn't mind much because I really liked how this one turned out. I received quite a lot of compliments at work on this one, and I was glad to finally use Snowfall over Au Champagne once again. I really like those two polishes together.
Showing posts with label white. Show all posts
Friday, December 26, 2014
Monday, March 17, 2014
St. Patrick's Day Skittles
I'm always jealous of skittle manicures. I love them when I see them, but my brain goes completely blank if I try to create one of my own. I can never think of designs that will be cohesive and so I usually scrap the whole idea and do something else. But I was determined to do skittle nails for St. Patrick's Day this year, and I think I actually pulled it off.
I'm really happy with them, I think they turned out pretty damn cute! I already had a basic idea in my head for what to put on 2 or 3 of my nails, so I started there and came up with the rest as I went along.
I started with 2 coats of China Glaze White On White on every nail. On my index finger, I stamped an argyle pattern from Konad plate m60, using Konad Special Polish in pastel orange. For the Irish flag, I used striping tape to mark off the nail into thirds, then used OPI Don't Mess With OPI for the green stripe, and OPI Where Did Suzi's Man-Go? for the orange stripe.
For the nail on my ring finger, I used Konad Special Polish in green to stamp the larger shamrock from Winstonia plate W105. Then I used the two tiny shamrocks from the shamrock design on Bundle Monster plate BM03 and randomly stamped them around the rest of the nail. And on my pinky nail, I used dotting tools to randomly dot Don't Mess With OPI and Where Did Suzi's Man-Go? around the nail in 3 different sizes.
Finally, on my thumb, I double stamped the plaid pattern from Konad plate m60, first using the Konad green Special Polish and then the Konad pastel orange. The plaid is a little wonky but the Konad full nail patterns are a little small for my thumbnail, so it was a bit hard to stamp it smoothly while trying to make sure I had it lined up on my nail just right. In retrospect, I probably should have put the plaid on another nail, like my pinky, and dotted my thumb instead. But by the time I decided on doing the plaid design, all my other nails were already finished.
In real life though, looking at it from a distance, the plaid looks much better. And I'm not expecting anyone to be grabbing my hand to get in nice and close like how it's zoomed in tight in the above picture, so I'm satisfied with it. And I absolutely love the overall look of all 5 designs together. If I had to choose though, I think the dots would be my favorite.
Labels:
BM03,
Bundle Monster,
China Glaze,
green,
Konad,
Konad Special Polish,
m60,
OPI,
orange,
skittle,
St. Patrick's Day,
stamping,
W105,
white,
Winstonia
Friday, February 14, 2014
Valentine 2014
Look at me, all posting a holiday mani on the actual holiday instead of a week later (or two weeks in the case of this past Christmas!). Not that this post went off without a hitch. I was originally planning to have this up Wednesday and then do another Valentine design Thursday, since I had the day off from work. But then word came of the impending snowpocalypse and schedules got switched, I ended up going in to work only to come back home when we shut down at noon because it was so bad out, and by then I...well, I just pretty much said screw it, ha! So without further ado, here is what turned out to be my lone Valentine manicure this year.
For this design, I started with 3 thin coats of China Glaze White on White. The design is from Winstonia plate W102. The polishes used are all Konad Special polishes: red, pink, pastel pink and dark red. I dabbed the 4 colors onto random spots of the design so that they would blend slightly during scraping.
At first, I felt like they needed something more, but the longer I wore them, the more I enjoyed them just the way they were.
Even though I'm not really one to celebrate Valentine's Day, I do seem to like doing Valentine themed designs. Maybe it's just because they are so many darn heart patterns in each stamping set I own. I also find that I really enjoy the outcome when I use white as a background for nail art, and this design is no exception to that. So this was definitely a win-win in my book.
Thursday, August 8, 2013
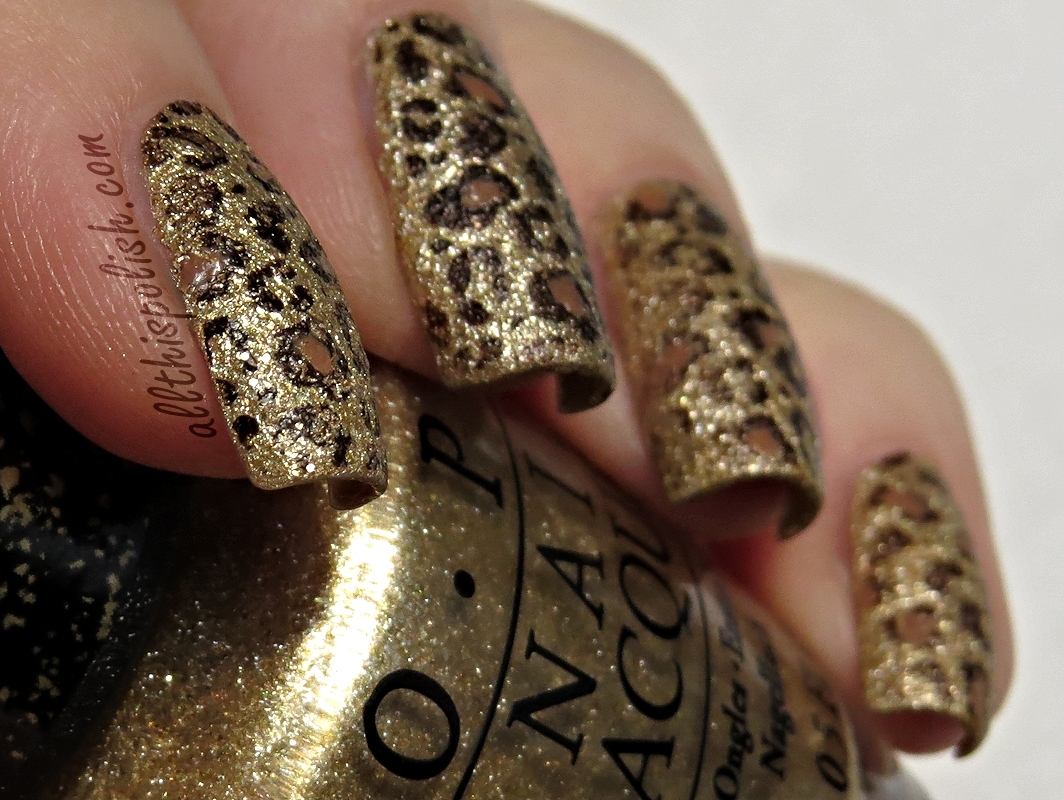
Animal Print and Liquid Sand
I've been wanting to try some stamping onto texture polishes for a while now. I see it online quite a bit and the texture always makes the stamped designs looks so interesting. A few of the polishes from the OPI Bond Girls collection were still in my untried pile and they ended up being great bases for some designs I don't really do often...animal print.
I decided to start by wearing OPI Solitaire. Once I had it on, zebra print immediately popped into my head. The design used is off of one of the large Cheeky plates, Jumbo Plate 12, and I stamped using Konad Special Polish in black. Solitaire went on very smoothly. I used three coats total. It took a little while to finish all three coats, but that's only because I waited as long as I could stand to wait between coats, to make sure the polish had dried as much as possible and that the texture was really set in.
Not only did the texture of the polish make the zebra print look pretty damn cool, I think the color was perfect for this. Solitaire is white but not so in-your-face as a pure white polish. It seemed to make the zebra print look more realistic.
I wore this mani for a week and then I decided to follow it up with leopard print, of course. This time, the base color was OPI Honey Ryder. 3 coats total for Honey Ryder as well, but it dried much faster for me than Solitaire did. The leopard print was from Konad plate m57. I did a few test stamps first and thought stamping with black polish looked like too much of a contrast, and not really the look I was going for. The Konad Special Polish in brown, however, stamped way too light over Honey Ryder and I didn't have any other brown polishes that would have worked well to stamp with. I ended up experimenting and plopped a blob of brown Konad polish down next to the leopard design and then, mixing it with a toothpick, I added just a tiny drop of the black Konad polish. Once they were mixed well, I used my scraper to push the polish to the edge of the leopard design and then scraped across like normal. To finish the look, I filled in about half of the leopard spots with a little bit of OPI San Tan-Tonio.
It sounds a little time consuming...ok, really time consuming...but it honestly didn't add much time at all to my normal stamping routine. And it was completely worth, because it was turned out exactly the way I had pictured it in my head.
I can't believe it took me so long to try zebra and leopard nails. Actually, I did attempt leopard print nails once before, but it was this awkward combination of a sage green polish and black and brown leopard print that looked more camouflage than leopard in the end and...ya, let's just not go there. This gold leopard print totally kicked that green leopard's ass. ;)
Labels:
animal print,
Cheeky,
Cheeky Jumbo Plate 12,
gold,
Konad,
leopard,
m57,
OPI,
stamping,
texture,
white,
zebra
Sunday, April 21, 2013
Zoya Sarah
I've actually owned my namesake from Zoya for a long time now, but I've only ever worn it on my toes before. The theme was "My Favorite Red" this past week in my favorite Facebook group and I thought it was a good time to break Zoya Sarah out from pile. I also had just received two new stamping plates on Monday, that I had purchased myself from Nailz Craze, so I was anxious to use them. This was 3 coats of Sarah, stamped with plate NC03 and Konad Special Polish in white.
I will say that I probably have other red polishes that I like a little more than Zoya Sarah, but Sarah is definitely near the top of the list. I like the darker, ruby tone of it and the subtle flaky sparkle it has. I think the sparkle is a bit more noticeable in the bottle than on the nails, but it's still pretty darn gorgeous. Like most Zoya polishes I've used, it had a great application. I might have been able to get away with 2 coats, especially since I was stamping over it, but I went with 3 just to even everything out.
The Nailz Craze plate, by the way, worked great. I've been wanting to buy a few of these plates for a while. I finally ordered them and I was not disappointed. The designs are a great size for all different nail lengths and quality of the plates is definitely high. I had no issues with stamping at all with this design. The design stamped clean and crisp each time.
I will say I had a tiny bit of staining when I took Zoya Sarah off. More staining on my skin actually than on my nails, but I think I can actually blame that on not taking my time removing the polish. I kind of rushed it and had too much remover on my cotton pads so I ended up with some excess remover running down my fingers leaving little trails of polish with it. It wore off with washing quickly though, so no real complaints. I'll just make to sure to be more careful the next time I wear this color!
Wednesday, March 13, 2013
Over The Rainbow
Remember a few months ago, I mentioned that I had a bunch of manicure pictures to post that I had taken when I was on sort of a blogging hiatus? Ya, well I still have them and these aren't them, lol. But this is another manicure that I ended up skipping over because of everything going on with the blogiversary, giveaway and my Valentine manicures. I'll get to the other pictures eventually, but I couldn't let these pictures sit on my hard drive any longer. This is another beauty from Amy's Nail Boutique, it's called Over The Rainbow.
How awesome is that?! Over The Rainbow is a white base with rainbow colored hex glitters, black and blue star glitters and red micro-glitter. I think the red micro-glitter was the perfect touch by Amy to pull everything together in the creamy white base.
I discovered that Over The Rainbow definitely would have been opaque on its own with probably just two coats. But I did start out with a base of Wet N Wild French White Creme just in case, since this was the first time I had worn Over The Rainbow. It applied so smoothly for me. With the first coat, a small amount of glitter spread out on each nail and with the second coat, the glitter distributed and built up perfectly. I didn't have any major issues with the star glitters either. A couple times actually, I had a few too many stars and had to use an extra brush stroke or two to spread them apart from each other or to wipe a couple extra stars off the nail.
I can't wait to wear this polish again. There's a lot of white based glitter polishes out there these days, but this is easily my favorite of them all.
Sunday, December 16, 2012
Christmas Lights
For my second Winter mani of the season, I leaned a bit more towards a Christmas design instead of just a basic Winter theme. I've been wanting to try out the Christmas light bulb design on the 2012 Bundle Monster plates since I first bought the set, so I figured now was as good a time as any to give it a shot.
I started out with a couple coats of Orly Au Champagne, then went over that with one coat of Sonnetarium Snowfall. I picked out 4 colors from my Konad Special Polishes to use for the bulbs: orange, blue, yellow and red. The bulb design can be found on plate BM-318. For each bulb, I stamped using one of the 4 colors and some Konad Special Polish in green for the little light socket part of the design. Then I used the same green Konad polish to freehand some wires connecting all the bulbs.
The only issue I had with this design was that the yellow bulbs were a lot harder to see in real life than they are in the pictures. You had to get really close to see the detail in the yellow bulbs but the other colors really popped well on the white background. Snowfall over Au Champagne was gorgeous all by itself. I didn't take any shots of it without the stamping (D'oh!), but it was so pretty that I think I might have to use this combination again at some point this Winter for another manicure. And I should have a new post up later this week of the design I have on right now, that I did to wear to my office Christmas Party last night. It reminds me of Christmas tree wrapping paper.
Labels:
BM-318,
Christmas,
glitter,
indie polishes,
Konad,
Orly,
Sonnetarium,
stamping,
white,
Winter
Sunday, July 22, 2012
Purple and Polka Dots
Just a quick post to let you know I'm still around! I've gotten a little blog lazy lately b/c of a lot of real world stuff going on all at once, one of which was a bridal shower I went to for a friend of mine last weekend. I got a cute purple top with white stripes to wear to it. I wanted my nails to match but not be too matchy, so instead of doing stripes to match the shirt exactly, I decided to mix patterns and wear purple with white polka dots on my nails.
The purple is OPI Funky Dunkey, which matched the purple in the shirt exactly! Then I just used Konad Special Polish in white and Konad plate m79 for the dots.
A super simple manicure but I think it was the perfect choice to go with my outfit.
Wednesday, July 4, 2012
Happy 4th of July!
Happy Independence Day everyone! Here's my manicure for the holiday this year. I've had this on since Sunday afternoon. I was thinking I might do a second manicure for July 4th but I might just end up leaving this on my nails for the rest of the week instead of changing it.
This was supposed to be a simple manicure but it turned out to take a hell of a lot more time than I thought it would, mostly due to uncooperative glitters. I started with two coats of Zoya Cynthia on all of my nails. Then I applied one coat of Candy Lacquer's American Pie to three fingers on each hand. My only complaint with American Pie is that the red hex glitters did not seem to want to come out of the bottle. It was really weird and a little frustrating because there are a lot of red hex glitters in the bottle, maybe not as many red as blue and white but enough that I expected to get a few on my nails naturally. But the majority of the red hexes you see on my nails were ones I placed individually with a toothpick. Other than that, the application was easy and I really like the glitter combo in this polish, especially over such a dark blue like Zoya Cynthia.
For my index fingers and thumbs, I used Wet n Wild Stars & Stripes. This was the glitter that really gave me a hard time. When I originally bought it a month or two ago, I pretty much expected that I might need to fish out a star or two during application, but I had to place every single glitter by hand, including the bar glitter! There is certainly a lot of stars and a ton of bar glitter in various sizes throughout the clear(ish) base (it's a little cloudy looking), but each time I tried to put on a coat with the brush, it looked like I was applying top coat. I got no stars, I got no bars. Ok, well maybe two or three measly little itty-bitty bars, but none of the thicker bars and not a damn star. It was hard just trying to scoop them out from the bottle in the first place. They just did not want to stick to the brush and come out. In the end though, I managed to get just enough stars and bar glitter out of the bottle and placed on my nails using a toothpick. Even though it's a total pain in the ass glitter, I don't regret buying it. First of all, it's Wet n Wild, so super cheap. I've spent more on a cell phone app than on this polish. The stars are a perfect size too...not too big, not too small. And did I mention the stars are holographic? I didn't? Oh, well hey, the stars are holographic! So ya, it was worth the aggravation.
I applied two coats of Seche Vite and then realized that I probably should have added at least one coat of Gelous first to really cover the stars sufficiently. But then I thought, well why not put the Gelous on top of the Seche Vite? So I did and it worked great. Booya! The Gelous dried just as shiny as the Seche Vite had been and if I didn't use the Gelous, I probably would have needed another two coats at least of SV to contain all the points on the star glitters. Even a friend at work made a comment on Monday, while examining my nails, that you couldn't feel the stars at all.
Here's hoping everyone has a great holiday today! Enjoy the parades, barbecues, fireworks and hopefully some good weather!
Labels:
blue,
Candy Lacquer,
glitter,
indie polishes,
July 4th,
red,
Wet n Wild,
white
Sunday, May 6, 2012
Olé Caliente and Connect the Dots
This is just a quick mani I put together Thursday night. I was getting bored with the rainbow manicure I did for the ASBMF Challenge but didn't feel like messing about with my ombre yet, since I'd never done one. So I reached for an untried polish that I had recently bought, Essie Olé Caliente. It was almost a one coater but I ended up using two just to even everything out. Then I added a layer of Lynnderella Connect the Dots.
I wasn't going to do a post on this but there were two things about this manicure that made me decide to post and they both revolve around the fact that Olé Caliente is super pigmented! I had Olé Caliente on my nails for almost two hours before I decided to do some layering with Connect the Dots, so it had been dry for a while. But when I was adding Connect the Dots, the coloring from Olé Caliente started bleeding onto the white glitter and even transferred a little onto the brush, which I then had to clean. It was much more noticeable in person than in the pictures, but you can definitely see the color smeared over the big white glitter on my index finger and in a couple spots on my middle and ring fingers also. After I did my left hand, I decided to put some Seche Vite top coat on the nails on my right hand before adding Connect the Dots. With a layer of top coat over Olé Caliente, I had no problems whatsoever when applying the glitter on my right hand, compared to my left. Today, when I took this manicure off, there was some staining on my nails but honestly, not as much as I expected. But the polish did a number on my skin when I was removing it. My fingers looked like I had dipped them in Kool-Aid! I think I spent more time cleaning the stains off my hands than I did getting the polish and glitter off my nails. This still was a great color and formula wise, it was a breeze to work with when applying. I'll just have to remember to add top coat to it first if I ever try to layer over it again, and to make sure I have extra time available for clean up when it's time to take it off.
Labels:
black,
Essie,
glitter,
indie polishes,
Lynnderella,
red,
white
Thursday, April 26, 2012
Spring ASBMF Challenge #4: April Showers
Back on Sunday, when I posted pictures of my glitter sandwich mattified, one of the things I mentioned was that I finally got around to doing the April Showers part of the April Showers Bring May Flowers Challenge. Well, it's now 4 days later and I finally got a chance to edit the pictures and put this post together. I wish I could say that I've been really busy with all sorts of important stuff, but the truth is that I just play way too many games on Facebook! One of the reasons that I had such a hard time with this part of the challenge was that I had just recently done an April Showers themed manicure back in March. I originally posted it about it here. So I was kinda stumped trying to think of something that wasn't too similar to what I had already done. When I was trying to come up with a design, I started to think about how my absolute favorite thing about rain showers is laying in bed late at night, with the window cracked open just a bit, listening to the rain hit off the blacktop on the street outside.
China Glaze Stone Cold is one of my recent buys that I had yet to try and I thought it would be perfect for representing a paved street. The gritty matte finish would be perfect to act as blacktop and once top coat was added, I thought it might give the impression of a wet, rain-soaked road.
I also wanted to do something different for the raindrops than what I had previously done. That was when I remembered I had bought a set of rhinestone wheels from Bundle Monster back in January and had yet to use any of them. Looking through the wheels, I came across these blue raindrop/teardrop shaped rhinestones that looked perfect for what I had in mind. I had a feeling that having these rhinestones on all of my nails would probably drive me nuts pretty quickly, so I settled on just using them for accent nails. And I decided to reuse the clouds idea from my previous April Showers manicure, but with a bit of a twist. Rather than having bright white clouds, I had an image in my head of darker, grey storm clouds staggered with white clouds overlapping them. My only problem was that I didn't have a very good grey polish for stamping. I couldn't get any greys to show up well over the black polish. So I decided to reverse my original idea and stamp white clouds first, then overlay grey clouds, so that part of the white clouds would remain intact and other parts would look darker and more stormy.
The clouds design is from Konad plate m79. For the white clouds, I used Konad Special Polish in white and I used China Glaze Recycle for the grey clouds. I used one coat of Seche Vite on all the nails with the clouds and two coats on the nails with the rhinestones. I ended up only wearing this for a few days. I put it together Sunday night, took pictures Monday and by Tuesday night I was taking it off. That's not to say that I didn't like it. But it was the first time I had ever worn rhinestones of any type on my nails and I was not used to my nails feeling bumpy like that. I kept having the urge to pick at those little buggers and knock them off my nails! I will just have to be try to get used to having bumpy nails once in a while, especially since I have so many more types of rhinestones in the Bundle Monster set that I want to try some day. I will say that I was surprised how well they stayed on. I just used top coat to put them in place and then, as I mentioned, used two coats of Seche Vite over them. That seemed to be enough top coat to get rid of any edges on the rhinestones that might have gotten caught on something and gotten them ripped off my nails.
Next up...A Rainbow After the Rain.
Be sure to check out some of the other ladies participating in this challenge.
Hannah from Polished Prisms
Amanda from Mandy's Polish
Heidi from DIY Polish & More
Katee from A Girl and Her Polish
Charlotte from Charlotte's Nails
Tess from Football and Fingernails
Karine from Karinea0a
Victoria from Manicurator
Sharon from What Color is My Coat?
Ashley from One Nail To Another
Dani from Rustic Comfort
Sue from Creative Design by Sue
Amanda from Counting Down to Bliss
Kayono from Neues vom Kellerkind
April from Munia's Nails
Sharra from The Blahg
Jess from Nearly Natural Nails
CR from Color Me Silly
T from Mami Blogs
Alyson from Beads. Nails. Food.
Labels:
accent nails,
ASBMF Challenge 2012,
black,
blue,
China Glaze,
grey,
Konad,
m79,
rhinestones,
white
Wednesday, April 11, 2012
Spring ASBMF Challenge #2: Ladybugs!
I have a short post today for my second installment of the Spring Challenge April Showers Bring May Flowers. Challenge #2 is ladybugs and I immediately thought of a ladybug design that is on one of my Bundle Monster stamping plates, plate BM13.
Even though I knew I wanted to use this plate, it took me a little while to figure out exactly how to use it. I did actually paint my nails with a medium gray to start but then when I stamped the first ladybug, the gray was just too dark so I scrapped that idea. I decided to stamp multiple ladybugs over Orly Au Champagne instead, but only as an accent so I applied 3 coats of Au Champagne to my thumbs and ring fingers. I spent the next 5 minutes marveling over Au Champagne's satin matte finish! Somehow, in all the reviews of the Orly Holiday Soiree collection this past winter, I had completely missed the fact that Au Champagne was a matte. I must have read it, but it somehow just never registered in my brain. I was so not expecting the beautiful satin matte finish it has and now I'm so glad that I bought this back when I saw it moved to the clearance table at Sally Beauty. I had only used it once before and that was just as a base on a nail wheel for swatching Lynnderella Snow Angel. I must have been so excited about getting my Lynnderella order that I was apparently oblivious to the finish of Au Champagne when it dried. Anyway...for the ladybugs, I applied a small amount of Konad Special Polish in red to the body of the ladybug design and a small amount of Konad Special Polish in black to the ladybug's head, then scraped and stamped.
I did that about 3 or 4 times per nail and just placed them in random directions on different parts of each nail. I took a small dotting tool and Wet n Wild Black Creme to fill in the dots of the ladybug design when Au Champagne showed through. On the rest of my nails I used 2 coats of Zoya Sooki and with the largest dotting tool and Wet n Wild Black Creme again, I placed random dots over Sooki to give it a ladybug motif.
I do really like this, but I'm not a huge ladybug fan, so I'll most likely be moving on to the next challenge within a day or two. Although I was happily surprised at the reactions I got at work today with this design. There were a lot of "Oh my God, are those ladybugs on your nails?!" It really got a lot more attention than I expected! One of the cool things about doing a challenge like this is that if I wasn't doing this challenge, I probably would have never done this design. But because of the challenge I was able to experiment and work with themes I probably wouldn't have thought to do on my own.
Be sure to keep an eye on Hannah's blog over at Polished Prisms. She'll be updating her posts with links to all the wonderful ladies also participating in this challenge. So check it out!
Labels:
accent nails,
ASBMF Challenge 2012,
black,
BM13,
Bundle Monster,
Orly,
red,
Spring,
stamping,
white,
Zoya
Saturday, March 17, 2012
Happy St. Patrick's Day!
Even though it turned out that my favorite St. Patrick's Day themed manicure was the plaid shamrocks I wore last week, I still made sure to rock some green all this past week up until today for St. Patrick's Day. I have to say though, I just wasn't up for elaborate designs. Am I the only one who was hit hard by the time change last weekend? It never bothered me in the past, but this year it just threw me completely off and I was just tired and lifeless all week long. I hope that's over with now and I'll get back on track this weekend.
For the first few days of the week, I had on a striped manicure using three different shades of green. I started with three coats of China Glaze Gaga For Green. I probably could have stopped at two coats, but there were a few thin spots on a couple of nails where Gaga For Green was going to be showing, so I went for a third coat to even it out.
Once that was done and dried completely, I scotch taped my nails and put on a thick coat of Zoya Shawn. When Shawn was dry, I repeated the scotch tape closer to the tips and put on a thick coat of China Glaze Holly-Day.
I wish it had looked as nice in real life as it does in the picture. In the picture, you can easily spot the difference between Zoya Shawn and China Glaze Holly-Day, but in real life you couldn't tell them apart in most light and so it looked like a weird two-tone off center pattern. It wasn't horrible like that, but it bugged me so I ending up wearing it like this only on Monday and then Monday night I took Zoya Goldie and attempted (key word: attempted) to freehand some straight lines to separate the three greens.
That just made it worse! If I could have done super thin lines, I think it would have worked better or if I had some thin gold nail art striping tape, that would have been perfect for this. This only lasted another day and then I put myself out of my misery with an Irish flag design with a twist. I started with three coats of Wet n Wild White Creme. Then using China Glaze Four Leaf Clover and Orly Crush On You, I made the horizontal stripes. I wore that plain for one day before deciding to take my red Konad Special Polish and Bundle Monster plate BM02 and stamp the lips design on as an accent on my ring and thumbnails, as a take on "Kiss Me, I'm Irish."
Labels:
accent nails,
BM02,
Bundle Monster,
China Glaze,
gold,
green,
orange,
Orly,
red,
scotch tape,
St. Patrick's Day,
stamping,
Wet n Wild,
white,
Zoya
Subscribe to:
Posts (Atom)