Showing posts with label Konad. Show all posts

Sunday, December 27, 2015

Christmas 2015 - Ugly Sweater Nails

I hope everyone had a great Christmas.  I can't believe it's over already.  I only did one Christmas themed look this year.  And actually, I ended up doing it twice.  The week of Christmas got a little hectic.  I needed to redo my nails, I had already been wearing the design for a week, so they were starting to look a little beat up.  But I just didn't have the time, or energy, to play around with a new look.  I still had all the same supplies out, and since I liked how they came out so much the first time, I just decided to redo the same design.  

MoYou London Festive 06

The base was sort of a recycled look for me.  I had used this same tape mani combo several years ago during the holidays, but for a snowflake look instead.  I started with 2 coats of China Glaze Poinsettia, then one coat of China Glaze Ring In The Red.  I top coated with Seche Vite and made sure it was completely dry before taping off my nails on the diagonal with just regular scotch tape.  Then I applied a thicker coat of China Glaze Glittering Garland, top coated and let dry before stamping.  The sweater stamp is from MoYou London Festive Collection 06, and I stamped the design with white Konad Special Polish.

MoYou London Festive 06

MoYou London Festive 06

I also gave my nails a little trim this month because of a few broken corners.  I wasn't thrilled with the idea of making my nails shorter, but in hindsight, it really worked out to be good timing; I don't think this stamp would have fit as well on my nails at the length they were before I filed them back.  

MoYou London Festive 06

I was really happy with how this look turned out.  I only had to redo a couple nails each time I wore this, because I thought I stamped the design a little crooked a time or two.  I always top coat my polish before I stamp, that way I have a little barrier of protection over my base polish in case I need to re-stamp a nail.  I can carefully wipe off the stamping polish with polish remover and a q-tip, without completely messing up the polish below.  And I was happy to pull out Ring In The Red from my melmer for the first time in a while.  That is still probably one of my favorite China Glaze glitters.

Monday, March 17, 2014

St. Patrick's Day Skittles

I'm always jealous of skittle manicures.  I love them when I see them, but my brain goes completely blank if I try to create one of my own.  I can never think of designs that will be cohesive and so I usually scrap the whole idea and do something else.  But I was determined to do skittle nails for St. Patrick's Day this year, and I think I actually pulled it off.


I'm really happy with them, I think they turned out pretty damn cute!  I already had a basic idea in my head for what to put on 2 or 3 of my nails, so I started there and came up with the rest as I went along.


I started with 2 coats of China Glaze White On White on every nail.  On my index finger, I stamped an argyle pattern from Konad plate m60, using Konad Special Polish in pastel orange.  For the Irish flag, I used striping tape to mark off the nail into thirds, then used OPI Don't Mess With OPI for the green stripe, and OPI Where Did Suzi's Man-Go? for the orange stripe.


For the nail on my ring finger, I used Konad Special Polish in green to stamp the larger shamrock from Winstonia plate W105.  Then I used the two tiny shamrocks from the shamrock design on Bundle Monster plate BM03 and randomly stamped them around the rest of the nail.  And on my pinky nail, I used dotting tools to randomly dot Don't Mess With OPI and Where Did Suzi's Man-Go? around the nail in 3 different sizes.


Finally, on my thumb, I double stamped the plaid pattern from Konad plate m60, first using the Konad green Special Polish and then the Konad pastel orange.  The plaid is a little wonky but the Konad full nail patterns are a little small for my thumbnail, so it was a bit hard to stamp it smoothly while trying to make sure I had it lined up on my nail just right.  In retrospect, I probably should have put the plaid on another nail, like my pinky, and dotted my thumb instead.  But by the time I decided on doing the plaid design, all my other nails were already finished.


In real life though, looking at it from a distance, the plaid looks much better.  And I'm not expecting anyone to be grabbing my hand to get in nice and close like how it's zoomed in tight in the above picture, so I'm satisfied with it.  And I absolutely love the overall look of all 5 designs together.  If I had to choose though, I think the dots would be my favorite.

Thursday, August 8, 2013

Animal Print and Liquid Sand

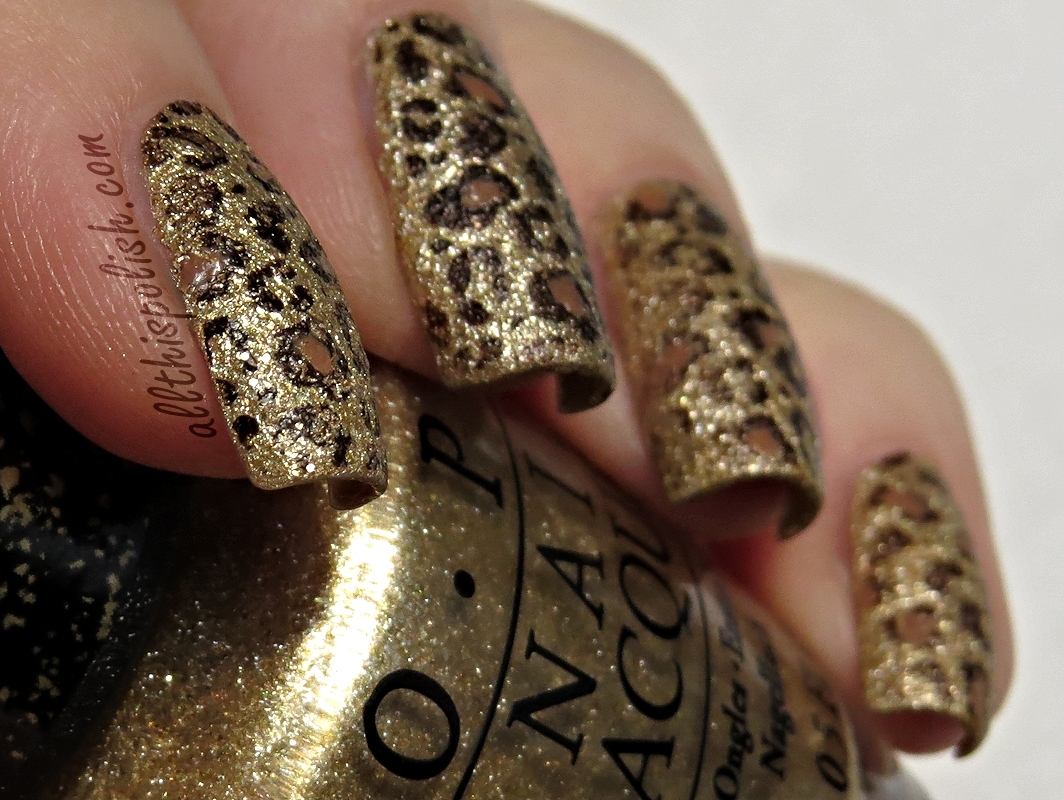
I've been wanting to try some stamping onto texture polishes for a while now.  I see it online quite a bit and the texture always makes the stamped designs looks so interesting.  A few of the polishes from the OPI Bond Girls collection were still in my untried pile and they ended up being great bases for some designs I don't really do often...animal print.


I decided to start by wearing OPI Solitaire.  Once I had it on, zebra print immediately popped into my head.  The design used is off of one of the large Cheeky plates, Jumbo Plate 12, and I stamped using Konad Special Polish in black.  Solitaire went on very smoothly.  I used three coats total.  It took a little while to finish all three coats, but that's only because I waited as long as I could stand to wait between coats, to make sure the polish had dried as much as possible and that the texture was really set in.


Not only did the texture of the polish make the zebra print look pretty damn cool, I think the color was perfect for this.  Solitaire is white but not so in-your-face as a pure white polish.  It seemed to make the zebra print look more realistic.


I wore this mani for a week and then I decided to follow it up with leopard print, of course.  This time, the base color was OPI Honey Ryder.  3 coats total for Honey Ryder as well, but it dried much faster for me than Solitaire did.  The leopard print was from Konad plate m57.  I did a few test stamps first and thought stamping with black polish looked like too much of a contrast, and not really the look I was going for.  The Konad Special Polish in brown, however, stamped way too light over Honey Ryder and I didn't have any other brown polishes that would have worked well to stamp with.  I ended up experimenting and plopped a blob of brown Konad polish down next to the leopard design and then, mixing it with a toothpick, I added just a tiny drop of the black Konad polish.  Once they were mixed well, I used my scraper to push the polish to the edge of the leopard design and then scraped across like normal.  To finish the look, I filled in about half of the leopard spots with a little bit of OPI San Tan-Tonio.


It sounds a little time consuming...ok, really time consuming...but it honestly didn't add much time at all to my normal stamping routine.  And it was completely worth, because it was turned out exactly the way I had pictured it in my head.


I can't believe it took me so long to try zebra and leopard nails.  Actually, I did attempt leopard print nails once before, but it was this awkward combination of a sage green polish and black and brown leopard print that looked more camouflage than leopard in the end and...ya, let's just not go there.  This gold leopard print totally kicked that green leopard's ass.  ;)

Sunday, March 17, 2013

Happy St. Patrick's Day!

A few months ago, I was contacted by Born Pretty Store with the opportunity to review one of their products.  I've been wanting to try playing around with loose glitter and they have a wide selection to choose from.  I ended up picking out some mini round glitters.  I wanted to try something other than the typical hex glitters but I wanted to try something a little more versatile than a specific shape, like hearts or stars, which might limit what designs you can use them with.  I originally was planning to use these in a Valentine's Day manicure, but I ended up saving them for St. Patrick's Day instead.


The glitters come in a set of 12 colors for $7.60.  Each color comes in its own resealable pot.  The pots may seem small but they are packed full of glitter.  I used anywhere from 15 to 20 pieces on each nail for this manicure and it didn't even make a dent in the glitter left in the pot.  They will definitely last a long time.  Click here to view more information on this product.

photo courtesy of BornPrettyStore.com

As you can see in the image above, the glitters are iridescent.  You may want to keep that in mind when deciding how to use them.  For example, I was originally thinking of using the white glitters for some type of Irish Flag design, but at different angles the white glitters reflect back a bright pink color and I didn't want that to throw off the design.  In the manicure I ended up doing, I used only the orange glitters.  But you can see in all the pictures, depending on how the light hits them, they also flash shades of green, which worked perfectly for this design actually!


My base is 3 coats of Revlon Tantalize.  I love shades of green like this!  I especially liked using it for this manicure because, while it is green, it is a bit of a non-traditional shade for St. Patrick's Day.  The application of this polish was super smooth, even though my bottle had a brush that was a bit lopsided.  And it doesn't say anything, anywhere about this polish being scented, so call me crazy, but the entire time I was painting my nails I could smell nothing but sour apple gum!  And the same thing happened when I was taking the manicure off.  So weird!   The shamrock was stamped on each nail using Konad Special Polish in white.  The design is actually from Born Pretty Store's Hello Kitty plate.  But I already owned that plate on my own, it was not sent to me for review as the glitters were.  To make the surface super smooth, I applied one coat of Gelous before applying Seche Vite as my top coat.


The glitters are pretty easy to apply.  I worked one nail at a time and just swiped on some top coat at an angle, then dipped a dotting tool in a bit of top coat to pick up and place the glitters one at a time in a staggered pattern.  I would suggest either using the glitters that stick to the lid first or spreading a little bit of the glitter out on either a piece of paper or a paper plate in order to pick them up.  Any time I tried to pick one up with the dotting tool straight from the pot, there was a static cling effect and I ended up with a little string of glitters.  You want to make sure to only pick up one at a time to be able to place them exactly where you want them on the nail.  If you decide to give these a try, or want to check out some of the other items available at Born Pretty Store, they have provided a code for my readers to get 10% off your order!


*Glitters sent for honest review.  Review contains only my personal opinion.*

Thursday, February 21, 2013

Valentine's 2013

Last week I wore two different designs during the week for Valentine's Day.  The first design was my first attempt at using striping tape and the second design was straight out of my good ol' comfort zone...plaid stamping.


For the first design, I started with a coat of Milani's one coat glitter in Red Sparkle.  Once that dried, I taped off 4 lines at random on most of my nails with striping tape.  Then, one nail at a time, I painted on one coat of Finger Paints Black Expressionism and immediately peeled off the striping tape to reveal the red glitter beneath.  On my ring finger, I stamped a hearts design from Bundle Monster plate BM-317 using Konad Special Polish in black.  Then I finished all the nails off with a coat of Seche Vite top coat.


The only thing I don't really like about the Milani one coat glitters is that when they dry, there always seems to be a few dull looking spots that top coat doesn't even seem to help.  I still loved the look but I kept thinking it might have turned out better if I had used Nubar Fire Sparkle like I did for Valentine's Day last year.

For the second design, I started with two coats of OPI Mod About You.  The plaid design is from Konad m60, stamped first with Konad Special Polish in black, then again with Konad white.  I was planing to stamp a single heart on each tip, but I could see the black lines showing through the first heart I stamped.  So I quickly scrapped that idea and grabbed the first red polish at hand, China Glaze Red Satin, and my dotting tools.  I used the largest dotting tool to dot one heart on each nail.  Then I re-dotted over the hearts using China Glaze Ring in the Red to add some glitter and also because Red Satin was a bit jelly and not quite opaque enough by itself.


I loved both of these designs but of course, big shocker, I loved the plaid more!

Sunday, January 27, 2013

Just Spotted the Lizard Gradient

OPI Just Spotted the Lizard is one of my many, many, oh so many untrieds.  I put it on not really having a plan, but knowing I wanted to do something with it besides leave it plain.  I decided to try out another gradient, since I could use the practice, and then stamped a simple Bundle Monster design over the whole thing.
 

For the gradient, I sponged on Finger Paints Black Expressionalism, then added some top coat to smooth everything out.  The stamp is from Bundle Monster plate BM-316, using Konad Special Polish in black, then some more top coat.  I wanted something simple, that would fade into the black tips and I didn't want to cover too much of Just Spotted the Lizard with the design.


Short post today, but there's not much else to say.  This was a super simple design to do but it also turned out to be one of my recent favorites.  And Just Spotted the Lizard is pretty kick ass to begin with.  Might have to grab myself a back up of this one if I ever run across it again.

Monday, January 14, 2013

Blue Gradient Snowflakes

Right before Christmas, my friend Kelly from work bought me this little polish set she found at Aeropostale.  She told me, "I don't know if the polish is any good, but I saw the glitter and rhinestones and had to buy it for you."  As soon as I opened it, I knew what kind of design I was going to do to use all 4 pieces in the set.


The set came with two polishes, a dark blue shade and a light blue shade (no names on them), and it also came with two little pots.  One pot was filled with loose glitter and the other contained small rhinestones.

photo courtesy of aeropostale.com

I started with two coats of the light blue polish and then sponged on the dark blue to create a gradient.  The gradient ended up being a bit more subtle than I had expected, but that was due to the light blue polish drying a lot darker than it looked in the bottle.  I still like the way it came out though.  Then using Bundle Monster plate BM-323 and Konad Special Polish in white, I stamped on the snowflakes. To apply the glitter and rhinestones, I worked on one nail at a time.  I applied one coat of clear polish and dipped a fan brush in the glitter and lightly sprinkled the glitter over the clear polish.  I dabbed on a dot of clear polish in the middle of the two largest snowflakes and, using an orange stick, applied two rhinestones.  Then repeated the process on each nail.  The glitter was a little rough, so I applied one coat of Gelous before applying Seche Vite.


I had originally planned to stamp the pattern in the opposite direction but didn't realize until after my entire left hand was done that I had reversed it.  So I decided to turn it around for my right hand.  I honestly couldn't decide which way I liked it better though.


The Aeropostale polish, by the way, was pretty good.  It applied really well and only took a couple coats to be opaque.  This manicure lasted a full week.  I was pleasantly surprised.

Wednesday, January 2, 2013

New Year's Nails

So, I don't really celebrate New Year's.  I mean, I do, I guess.  But I don't get all jazzed up and go out on the town in a glittery dress and high heels.  That's just not me.  But...there should be a little glitter on New Year's, right?  So it might as well be on my nails.


This is the manicure that I wore on New Year's Eve.  It's not exactly the Times Square Ball but that was sort of my inspiration for this look.  The bulk of the glitter in China Glaze Ray-Diant has a kind of green-gold-silver look to it and reminds me of the metal framing of the Times Square Ball.  It's mixed with a bunch of glitter in all different colors, which reminds me of all the different colors and patterns the ball is able to display once the lights are turned on.  The framing on the actual Times Square Ball is a triangle pattern but a diamond pattern was as close as I could get after sorting through all my different stamping plates.  This pattern is from Bundle Monster plate BM-310.


I started out with two thin coats of Orly Dazzle as a base for two thin coats of Ray-Diant.  The first time I wore Ray-Diant, it chipped like a son-of-a-bitch the very next day.  I was not very pleased.  I decided this time to try laying it over a solid color instead of using as many coats of just the glitter to get it opaque.  I had just done this a little earlier with OPI's Spark De Triomphe, which is about the same consistency as Ray-Diant.  That manicure lasted 4 days, zero chips and I could have worn it longer except I took it off to do these nails instead for New Year's.


The glitter was a bit bumpy so I decided to top coat before stamping to try and get a smoother surface to work on.  I applied one coat of Gelous and then one coat of Seche Vite.  I'm not entirely sure it makes much of a difference but sometimes when I stamp on top of a rough glitter, the bumps in the glitter can show through the stamping.  So better to just add a little top coat now just in case than be mad later that I didn't try it.  The pattern from BM-310 is stamped using Konad Special Polish in black.


After stamping, I finished everything off with one more coat of Gelous and a coat of Seche Vite.  I did the stamping on Monday but I've actually had the glitter on since Sunday and still have no chips.  So I think using less coats of glitter over a similar base color was the way to go.  I'll be sure to try it anytime I wear any of the other glitters from the China Glaze Prismatic collection.  So that was my bling for New Year's.  I hope everyone had a great night Monday ringing in 2013.  Happy New Year!

Saturday, December 22, 2012

Christmas Tree Wrapping Paper

Last weekend was the annual Christmas party held by the owners of the company I work for and I wanted to do something new on my nails for the party.  I decided to try out the little abstract Christmas tree design on the newest Bundle Monster set.  It is from plate BM-321.  I was actually planning to use the Christmas tree stamp along with a few other Christmas themed stamps like the gift box and the ornament but I didn't like the way that they were stamping so I decided to just stick with the trees.  I was afraid that the trees would be too plain completely by themselves, so I came across a swirly type design on Bundle Monster plate BM-224 and stamped it a couple times on each nail as a background to the trees.  The final result ended up reminding me of something you might see on Christmas wrapping paper.


For my base color, I used Orly Dazzle.  I stamped the swirl design with Konad Special Polish in white.  Then using Konad green for the tree and Konad red for the tree base, I stamped about four trees randomly on top of the swirls on each nail.


I really like Orly Dazzle as a base for stamping.  I've used it before and I love the way the stamped designs look over the silver background.


I'll probably do at least one or maybe two more Christmas type manicures before the holiday, but I don't know if I'll have time to actually post them until after Christmas.  So if I don't get a chance before Tuesday, here's wishing everyone a Merry Christmas and Happy Holidays!!!

Sunday, December 16, 2012

Christmas Lights

For my second Winter mani of the season, I leaned a bit more towards a Christmas design instead of just a basic Winter theme.  I've been wanting to try out the Christmas light bulb design on the 2012 Bundle Monster plates since I first bought the set, so I figured now was as good a time as any to give it a shot.


I started out with a couple coats of Orly Au Champagne, then went over that with one coat of Sonnetarium Snowfall.  I picked out 4 colors from my Konad Special Polishes to use for the bulbs: orange, blue, yellow and red.  The bulb design can be found on plate BM-318.  For each bulb, I stamped using one of the 4 colors and some Konad Special Polish in green for the little light socket part of the design.  Then I used the same green Konad polish to freehand some wires connecting all the bulbs.


The only issue I had with this design was that the yellow bulbs were a lot harder to see in real life than they are in the pictures.  You had to get really close to see the detail in the yellow bulbs but the other colors really popped well on the white background.  Snowfall over Au Champagne was gorgeous all by itself.  I didn't take any shots of it without the stamping (D'oh!), but it was so pretty that I think I might have to use this combination again at some point this Winter for another manicure.  And I should have a new post up later this week of the design I have on right now, that I did to wear to my office Christmas Party last night.  It reminds me of Christmas tree wrapping paper.

LinkWithin

Related Posts Plugin for WordPress, Blogger...