So I did end up doing a second July 4th manicure on Friday afternoon, to wear for the rest of this weekend. I posted a quick cell phone shot on Instagram Friday after it was done, but Saturday morning I was able to get some better shots in natural light with my Canon. I wanted to break out a few Zoya PixieDust polishes because I thought they would work well for another flag design. I'm so glad I did because I'm pretty sure this is now my new favorite July 4th manicure.
Initially, I was a little worried that the stars and stripes wouldn't show up that well over the darker colors, but the stamping actually came out more opaque than I expected. I really like the way the white has just a slightly faded look to it. Mixed with the texture of the PixieDust bases, it really reminds me of pictures of historic, vintage looking flags.
All stamping was done using Konad Special Polish in white. For the blue base, I used 2 coats of Zoya Sunshine. The red base is 3 coats of Zoya Chyna. The stars design is off of Nailz Craze plate NC05 and the stripes are from Winstonia plate W107.
I can definitely see this being my go-to design for any patriotic holidays anytime I might have trouble coming up with something new to wear instead.
Showing posts with label texture. Show all posts
Sunday, July 6, 2014
Friday, May 23, 2014
KBShimmer Early Summer Collection 2014 - The Textures
Press Sample
Today is the launch of the new KBShimmer Early Summer 2014 Collection and I have the last 3 polishes I received for review to show to you. These are the new textures and I have to say they are pretty cool. The polishes are not super textured. They contain quite a bit of glitter so they are chunkier compared to something like Zoya's regular PixieDust polishes, but they are not as chunky as the newer Zoya Magical PixieDust shades. The textures all have a jelly base and dry to a semi-matte finish. I got full coverage with all three shades with just 2 coats, but I did dab on a bit more polish in a few spots that seemed to not get as much glitter. And I wore these without top coat, to keep the textured finish. First up is my absolute favorite of the entire Early Summer Collection, Partners In Lime.
I love this bright lime jelly base, containing lime green, aqua and gold holographic glitters. I wore this polish again after swatching but with top coat and some stamping, and the glitter really made the whole design pop. I'm hoping to get a separate post up on that mani in the next few days.
The 2nd texture polish is a bright turquoise called She Twerks Out.
She Twerks Out is full of holographic glitters in teal, lime green, aqua, and violet. Really easy application in just 2 coats, with just an extra dab or two near the tips to cover a few spots of visible nail line.
The last of the 3 textures is a bright purple called Too Pop To Handle. The jelly base in this was more opaque, I applied two coats and didn't feel like there were any spots I needed to touch up.
Too Pop To Handle contains violet, magenta, pink and aqua holographic glitters. It had a smooth formula, as did all three of the textures. And all three, when dry, had the same degree of texture to their finish.
I have to say that at first I was a bit worried when I heard KBShimmer was releasing some textured polishes, just because there are so many textured polishes out there already. But I ended up really liking these three textures a great deal, especially because of the multi-colored glitters mixed in. I've only tried top coating Partners In Lime, but I had great results so I plan to try it out with the other 2 textures and use them as a base for some nail art in the near future. The texture polishes retail for $8.75 each. The textures, as well as the entire Early Summer 2014 Collection, are available for purchase starting today at KBShimmer.com.
*Polish sent for honest review. Review contains only my personal opinions.*
Labels:
green,
indie polishes,
KBShimmer,
press sample,
purple,
review,
swatches,
texture,
turquoise
Wednesday, January 1, 2014
Happy 2014!
I'm starting out the new year with nubs. My cracked/patched left index nail broke off completely yesterday while I was taking off polish to do a New Year's mani. I also had two patched nails on my right hand that I was sick of dealing with, so at that point I basically said screw it, and proceeded to just chop them all down. My nails are never a consistent length anyway, so what the hell! And I think my New Year's design turned out pretty cute in the end with the new nubs.
I kept it pretty simple. I've kind of felt uninspired lately so I almost didn't do a New Year's mani at all this year. But I decided to paint my nails with Zoya Tomoko (3 thin coats). Then after they were painted, I tried to figure out what the hell to put on them, lol. I knew I wanted to use the champagne flutes from Winstonia plate W117. Then I came across a circles pattern on Pueen plate 36 that reminded me of champagne bubbles, so I combined the two.
The circles pattern was stamped on every nail except my ring finger. For the accent nail, I stamped the champagne flutes first and then stamped random parts of the circles pattern around the flutes. Everything was stamped using Konad Special Polish in black pearl.
I do love when my nails are longer, but I'm really enjoying this length as well. Maybe that's why I can never decide on one length to keep them at all the time. Anyway, hope you all had a great New Year's Eve and here's to a great 2014! Thanks for following along in 2013. :)
I kept it pretty simple. I've kind of felt uninspired lately so I almost didn't do a New Year's mani at all this year. But I decided to paint my nails with Zoya Tomoko (3 thin coats). Then after they were painted, I tried to figure out what the hell to put on them, lol. I knew I wanted to use the champagne flutes from Winstonia plate W117. Then I came across a circles pattern on Pueen plate 36 that reminded me of champagne bubbles, so I combined the two.
The circles pattern was stamped on every nail except my ring finger. For the accent nail, I stamped the champagne flutes first and then stamped random parts of the circles pattern around the flutes. Everything was stamped using Konad Special Polish in black pearl.
I do love when my nails are longer, but I'm really enjoying this length as well. Maybe that's why I can never decide on one length to keep them at all the time. Anyway, hope you all had a great New Year's Eve and here's to a great 2014! Thanks for following along in 2013. :)
Labels:
Konad Special Polish,
New Year's,
Pueen,
PUEEN36,
stamping,
texture,
W117,
Winstonia,
Zoya
Thursday, August 8, 2013
Animal Print and Liquid Sand
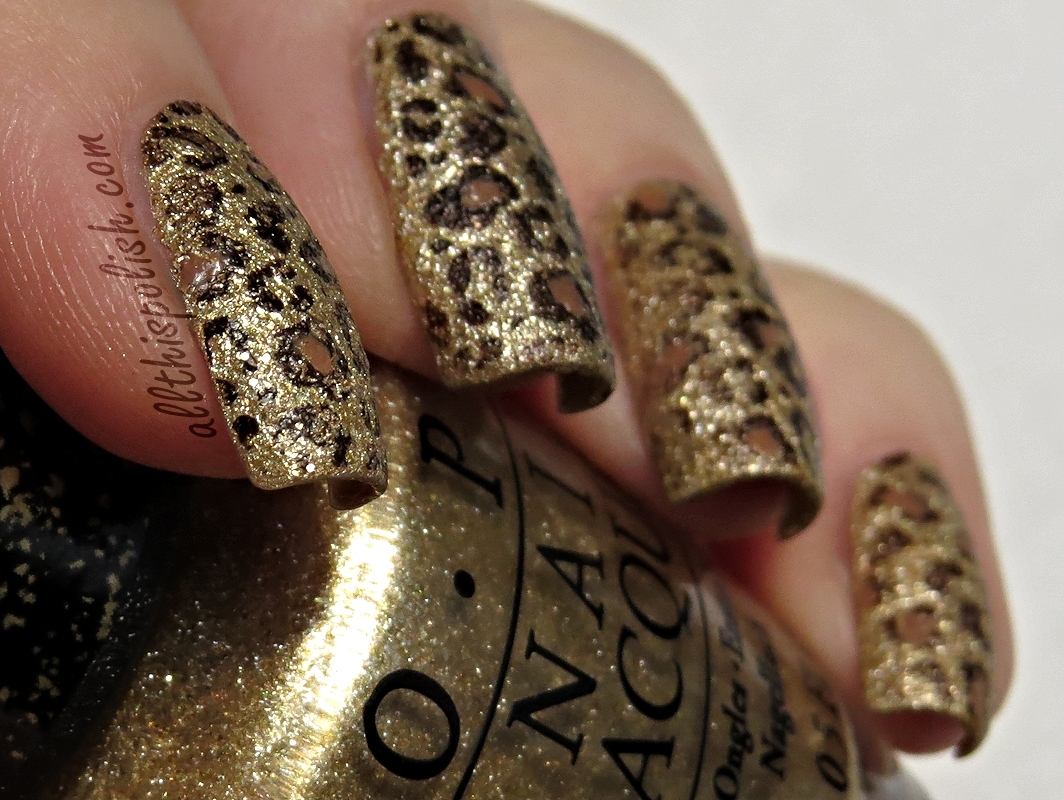
I've been wanting to try some stamping onto texture polishes for a while now. I see it online quite a bit and the texture always makes the stamped designs looks so interesting. A few of the polishes from the OPI Bond Girls collection were still in my untried pile and they ended up being great bases for some designs I don't really do often...animal print.
I decided to start by wearing OPI Solitaire. Once I had it on, zebra print immediately popped into my head. The design used is off of one of the large Cheeky plates, Jumbo Plate 12, and I stamped using Konad Special Polish in black. Solitaire went on very smoothly. I used three coats total. It took a little while to finish all three coats, but that's only because I waited as long as I could stand to wait between coats, to make sure the polish had dried as much as possible and that the texture was really set in.
Not only did the texture of the polish make the zebra print look pretty damn cool, I think the color was perfect for this. Solitaire is white but not so in-your-face as a pure white polish. It seemed to make the zebra print look more realistic.
I wore this mani for a week and then I decided to follow it up with leopard print, of course. This time, the base color was OPI Honey Ryder. 3 coats total for Honey Ryder as well, but it dried much faster for me than Solitaire did. The leopard print was from Konad plate m57. I did a few test stamps first and thought stamping with black polish looked like too much of a contrast, and not really the look I was going for. The Konad Special Polish in brown, however, stamped way too light over Honey Ryder and I didn't have any other brown polishes that would have worked well to stamp with. I ended up experimenting and plopped a blob of brown Konad polish down next to the leopard design and then, mixing it with a toothpick, I added just a tiny drop of the black Konad polish. Once they were mixed well, I used my scraper to push the polish to the edge of the leopard design and then scraped across like normal. To finish the look, I filled in about half of the leopard spots with a little bit of OPI San Tan-Tonio.
It sounds a little time consuming...ok, really time consuming...but it honestly didn't add much time at all to my normal stamping routine. And it was completely worth, because it was turned out exactly the way I had pictured it in my head.
I can't believe it took me so long to try zebra and leopard nails. Actually, I did attempt leopard print nails once before, but it was this awkward combination of a sage green polish and black and brown leopard print that looked more camouflage than leopard in the end and...ya, let's just not go there. This gold leopard print totally kicked that green leopard's ass. ;)
I decided to start by wearing OPI Solitaire. Once I had it on, zebra print immediately popped into my head. The design used is off of one of the large Cheeky plates, Jumbo Plate 12, and I stamped using Konad Special Polish in black. Solitaire went on very smoothly. I used three coats total. It took a little while to finish all three coats, but that's only because I waited as long as I could stand to wait between coats, to make sure the polish had dried as much as possible and that the texture was really set in.
Not only did the texture of the polish make the zebra print look pretty damn cool, I think the color was perfect for this. Solitaire is white but not so in-your-face as a pure white polish. It seemed to make the zebra print look more realistic.
I wore this mani for a week and then I decided to follow it up with leopard print, of course. This time, the base color was OPI Honey Ryder. 3 coats total for Honey Ryder as well, but it dried much faster for me than Solitaire did. The leopard print was from Konad plate m57. I did a few test stamps first and thought stamping with black polish looked like too much of a contrast, and not really the look I was going for. The Konad Special Polish in brown, however, stamped way too light over Honey Ryder and I didn't have any other brown polishes that would have worked well to stamp with. I ended up experimenting and plopped a blob of brown Konad polish down next to the leopard design and then, mixing it with a toothpick, I added just a tiny drop of the black Konad polish. Once they were mixed well, I used my scraper to push the polish to the edge of the leopard design and then scraped across like normal. To finish the look, I filled in about half of the leopard spots with a little bit of OPI San Tan-Tonio.
It sounds a little time consuming...ok, really time consuming...but it honestly didn't add much time at all to my normal stamping routine. And it was completely worth, because it was turned out exactly the way I had pictured it in my head.
I can't believe it took me so long to try zebra and leopard nails. Actually, I did attempt leopard print nails once before, but it was this awkward combination of a sage green polish and black and brown leopard print that looked more camouflage than leopard in the end and...ya, let's just not go there. This gold leopard print totally kicked that green leopard's ass. ;)
Labels:
animal print,
Cheeky,
Cheeky Jumbo Plate 12,
gold,
Konad,
leopard,
m57,
OPI,
stamping,
texture,
white,
zebra
Subscribe to:
Posts (Atom)