So I did end up doing a second July 4th manicure on Friday afternoon, to wear for the rest of this weekend. I posted a quick cell phone shot on Instagram Friday after it was done, but Saturday morning I was able to get some better shots in natural light with my Canon. I wanted to break out a few Zoya PixieDust polishes because I thought they would work well for another flag design. I'm so glad I did because I'm pretty sure this is now my new favorite July 4th manicure.
Initially, I was a little worried that the stars and stripes wouldn't show up that well over the darker colors, but the stamping actually came out more opaque than I expected. I really like the way the white has just a slightly faded look to it. Mixed with the texture of the PixieDust bases, it really reminds me of pictures of historic, vintage looking flags.
All stamping was done using Konad Special Polish in white. For the blue base, I used 2 coats of Zoya Sunshine. The red base is 3 coats of Zoya Chyna. The stars design is off of Nailz Craze plate NC05 and the stripes are from Winstonia plate W107.
I can definitely see this being my go-to design for any patriotic holidays anytime I might have trouble coming up with something new to wear instead.
Showing posts with label Winstonia. Show all posts
Sunday, July 6, 2014
Monday, March 17, 2014
St. Patrick's Day Skittles
I'm always jealous of skittle manicures. I love them when I see them, but my brain goes completely blank if I try to create one of my own. I can never think of designs that will be cohesive and so I usually scrap the whole idea and do something else. But I was determined to do skittle nails for St. Patrick's Day this year, and I think I actually pulled it off.
I'm really happy with them, I think they turned out pretty damn cute! I already had a basic idea in my head for what to put on 2 or 3 of my nails, so I started there and came up with the rest as I went along.
I started with 2 coats of China Glaze White On White on every nail. On my index finger, I stamped an argyle pattern from Konad plate m60, using Konad Special Polish in pastel orange. For the Irish flag, I used striping tape to mark off the nail into thirds, then used OPI Don't Mess With OPI for the green stripe, and OPI Where Did Suzi's Man-Go? for the orange stripe.
For the nail on my ring finger, I used Konad Special Polish in green to stamp the larger shamrock from Winstonia plate W105. Then I used the two tiny shamrocks from the shamrock design on Bundle Monster plate BM03 and randomly stamped them around the rest of the nail. And on my pinky nail, I used dotting tools to randomly dot Don't Mess With OPI and Where Did Suzi's Man-Go? around the nail in 3 different sizes.
Finally, on my thumb, I double stamped the plaid pattern from Konad plate m60, first using the Konad green Special Polish and then the Konad pastel orange. The plaid is a little wonky but the Konad full nail patterns are a little small for my thumbnail, so it was a bit hard to stamp it smoothly while trying to make sure I had it lined up on my nail just right. In retrospect, I probably should have put the plaid on another nail, like my pinky, and dotted my thumb instead. But by the time I decided on doing the plaid design, all my other nails were already finished.
In real life though, looking at it from a distance, the plaid looks much better. And I'm not expecting anyone to be grabbing my hand to get in nice and close like how it's zoomed in tight in the above picture, so I'm satisfied with it. And I absolutely love the overall look of all 5 designs together. If I had to choose though, I think the dots would be my favorite.
I'm really happy with them, I think they turned out pretty damn cute! I already had a basic idea in my head for what to put on 2 or 3 of my nails, so I started there and came up with the rest as I went along.
I started with 2 coats of China Glaze White On White on every nail. On my index finger, I stamped an argyle pattern from Konad plate m60, using Konad Special Polish in pastel orange. For the Irish flag, I used striping tape to mark off the nail into thirds, then used OPI Don't Mess With OPI for the green stripe, and OPI Where Did Suzi's Man-Go? for the orange stripe.
For the nail on my ring finger, I used Konad Special Polish in green to stamp the larger shamrock from Winstonia plate W105. Then I used the two tiny shamrocks from the shamrock design on Bundle Monster plate BM03 and randomly stamped them around the rest of the nail. And on my pinky nail, I used dotting tools to randomly dot Don't Mess With OPI and Where Did Suzi's Man-Go? around the nail in 3 different sizes.
Finally, on my thumb, I double stamped the plaid pattern from Konad plate m60, first using the Konad green Special Polish and then the Konad pastel orange. The plaid is a little wonky but the Konad full nail patterns are a little small for my thumbnail, so it was a bit hard to stamp it smoothly while trying to make sure I had it lined up on my nail just right. In retrospect, I probably should have put the plaid on another nail, like my pinky, and dotted my thumb instead. But by the time I decided on doing the plaid design, all my other nails were already finished.
In real life though, looking at it from a distance, the plaid looks much better. And I'm not expecting anyone to be grabbing my hand to get in nice and close like how it's zoomed in tight in the above picture, so I'm satisfied with it. And I absolutely love the overall look of all 5 designs together. If I had to choose though, I think the dots would be my favorite.
Labels:
BM03,
Bundle Monster,
China Glaze,
green,
Konad,
Konad Special Polish,
m60,
OPI,
orange,
skittle,
St. Patrick's Day,
stamping,
W105,
white,
Winstonia
Friday, February 14, 2014
Valentine 2014
Look at me, all posting a holiday mani on the actual holiday instead of a week later (or two weeks in the case of this past Christmas!). Not that this post went off without a hitch. I was originally planning to have this up Wednesday and then do another Valentine design Thursday, since I had the day off from work. But then word came of the impending snowpocalypse and schedules got switched, I ended up going in to work only to come back home when we shut down at noon because it was so bad out, and by then I...well, I just pretty much said screw it, ha! So without further ado, here is what turned out to be my lone Valentine manicure this year.
For this design, I started with 3 thin coats of China Glaze White on White. The design is from Winstonia plate W102. The polishes used are all Konad Special polishes: red, pink, pastel pink and dark red. I dabbed the 4 colors onto random spots of the design so that they would blend slightly during scraping.
At first, I felt like they needed something more, but the longer I wore them, the more I enjoyed them just the way they were.
Even though I'm not really one to celebrate Valentine's Day, I do seem to like doing Valentine themed designs. Maybe it's just because they are so many darn heart patterns in each stamping set I own. I also find that I really enjoy the outcome when I use white as a background for nail art, and this design is no exception to that. So this was definitely a win-win in my book.
For this design, I started with 3 thin coats of China Glaze White on White. The design is from Winstonia plate W102. The polishes used are all Konad Special polishes: red, pink, pastel pink and dark red. I dabbed the 4 colors onto random spots of the design so that they would blend slightly during scraping.
At first, I felt like they needed something more, but the longer I wore them, the more I enjoyed them just the way they were.
Even though I'm not really one to celebrate Valentine's Day, I do seem to like doing Valentine themed designs. Maybe it's just because they are so many darn heart patterns in each stamping set I own. I also find that I really enjoy the outcome when I use white as a background for nail art, and this design is no exception to that. So this was definitely a win-win in my book.
Wednesday, January 1, 2014
Happy 2014!
I'm starting out the new year with nubs. My cracked/patched left index nail broke off completely yesterday while I was taking off polish to do a New Year's mani. I also had two patched nails on my right hand that I was sick of dealing with, so at that point I basically said screw it, and proceeded to just chop them all down. My nails are never a consistent length anyway, so what the hell! And I think my New Year's design turned out pretty cute in the end with the new nubs.
I kept it pretty simple. I've kind of felt uninspired lately so I almost didn't do a New Year's mani at all this year. But I decided to paint my nails with Zoya Tomoko (3 thin coats). Then after they were painted, I tried to figure out what the hell to put on them, lol. I knew I wanted to use the champagne flutes from Winstonia plate W117. Then I came across a circles pattern on Pueen plate 36 that reminded me of champagne bubbles, so I combined the two.
The circles pattern was stamped on every nail except my ring finger. For the accent nail, I stamped the champagne flutes first and then stamped random parts of the circles pattern around the flutes. Everything was stamped using Konad Special Polish in black pearl.
I do love when my nails are longer, but I'm really enjoying this length as well. Maybe that's why I can never decide on one length to keep them at all the time. Anyway, hope you all had a great New Year's Eve and here's to a great 2014! Thanks for following along in 2013. :)
I kept it pretty simple. I've kind of felt uninspired lately so I almost didn't do a New Year's mani at all this year. But I decided to paint my nails with Zoya Tomoko (3 thin coats). Then after they were painted, I tried to figure out what the hell to put on them, lol. I knew I wanted to use the champagne flutes from Winstonia plate W117. Then I came across a circles pattern on Pueen plate 36 that reminded me of champagne bubbles, so I combined the two.
The circles pattern was stamped on every nail except my ring finger. For the accent nail, I stamped the champagne flutes first and then stamped random parts of the circles pattern around the flutes. Everything was stamped using Konad Special Polish in black pearl.
I do love when my nails are longer, but I'm really enjoying this length as well. Maybe that's why I can never decide on one length to keep them at all the time. Anyway, hope you all had a great New Year's Eve and here's to a great 2014! Thanks for following along in 2013. :)
Labels:
Konad Special Polish,
New Year's,
Pueen,
PUEEN36,
stamping,
texture,
W117,
Winstonia,
Zoya
Sunday, December 22, 2013
Winter Wonderland
A few weeks ago, OPI Ink & OPI Ink Suede had come up in a conversation and it reminded me that it had been a while since I'd worn any of the OPI Suede shades. So I pulled out OPI Ink Suede from the drawer and used it as a background for a snowy, winter design. And yes, I know it's meant to have a suede/matte finish, but I also love the way all the OPI Suedes look when top coated. I think the way that top coat brings out the sparkle in the OPI Suede shades was perfect for this design.
I didn't want too much empty space between the snowflakes, so I first stamped a scattered sparkles design from Nailz Craze plate NC02, using Konad Special Polish in pastel blue. For the snowflakes, I stamped with Konad Special Polish in white and used a mix of snowflakes from several different Bundle Monster plates (BM14, BM-319 and BM-H01) along with several snowflake designs from Winstonia plate W120.
When I finished stamping, I felt like it was missing something. I ended up adding just a little bit of Sonnetarium Snowfall. Instead of brushing the glitter over the entire nail, I used the tip of the brush to dab on just a little glitter in the spots between the snowflakes that seemed a bit bare. Then I top coated the whole thing with Seche Vite.
The light blue sparkles in the background didn't turn out as noticeable as I had originally thought they would, but I still loved the little touch of light blue to contrast the dark blue of the OPI Ink Suede and the bright white snowflakes.
I didn't want too much empty space between the snowflakes, so I first stamped a scattered sparkles design from Nailz Craze plate NC02, using Konad Special Polish in pastel blue. For the snowflakes, I stamped with Konad Special Polish in white and used a mix of snowflakes from several different Bundle Monster plates (BM14, BM-319 and BM-H01) along with several snowflake designs from Winstonia plate W120.
When I finished stamping, I felt like it was missing something. I ended up adding just a little bit of Sonnetarium Snowfall. Instead of brushing the glitter over the entire nail, I used the tip of the brush to dab on just a little glitter in the spots between the snowflakes that seemed a bit bare. Then I top coated the whole thing with Seche Vite.
The light blue sparkles in the background didn't turn out as noticeable as I had originally thought they would, but I still loved the little touch of light blue to contrast the dark blue of the OPI Ink Suede and the bright white snowflakes.
Labels:
blue,
BM-319,
BM-H01,
BM14,
Bundle Monster,
Nailz Craze,
OPI,
snowflakes,
Sonnetarium,
stamping,
W120,
Winstonia,
Winter
Saturday, November 30, 2013
Falling Leaves
I tried to do some turkey nail art this past week for Thanksgiving, I really did, but I just couldn't get inspired. I really had no clue what to put on my nails actually. All I knew was that my bottle of Zoya Mitzi happened to be sitting out on my nightstand and I felt like I needed to use it. After looking through my stamping plates, I decided it might make a good background for some random leaves in Autumn colors.
Zoya Mitzi is a matte finish and it seemed a bit streaky to me. I needed 3 coats to get it perfectly even. The leaves all came from different plates: Red Angel plates RA-118 and RA-121, and Winstonia plate W113. Pardon the crappy cell phone picture below. I just took this as a reference shot so that when I got around to writing this, I wouldn't have to dig out my plates again to get the numbers. But I might as well just include it in the post.
The polishes used for stamping were Konad Special Polishes in green, pastel orange, dark orange and dark red. Sometimes I dropped blobs of all 4 colors onto a leaf, other times I used just 2 or 3 of the colors. I also experimented a bit with mixing the colors with a toothpick on the plate before scraping. But the scraping action itself would also blend the colors inside the leaf patterns.
For placement, I just stamped the leaves randomly on each nail. I didn't like all the open space between the leaves, so to fill it in a bit, I used a toothpick and added some dots using the same Konad polishes.
This definitely turned out to be one of my all time favorite looks. I wore it for the whole week, but I'm still a little sad to take it off!
Labels:
Autumn,
green,
Konad Special Polish,
RA-118,
RA-121,
Red Angel,
stamping,
Thanksgiving,
W113,
Winstonia,
Zoya
Thursday, October 31, 2013
Halloween 2013 - Spooky Silhouettes
I wanted to do something kind of cool for Halloween this year, because I pretty much flaked on Halloween last year. I was coming up short on ideas though, so I did a simple Google Images search on "Halloween" to see if I could get inspired. A bunch of the results were wallpapers or clip art with some type of silhouettes in front of a roundish, full moon looking orange glow. I decided to try and translate that look to my nails and here's what I came up with!
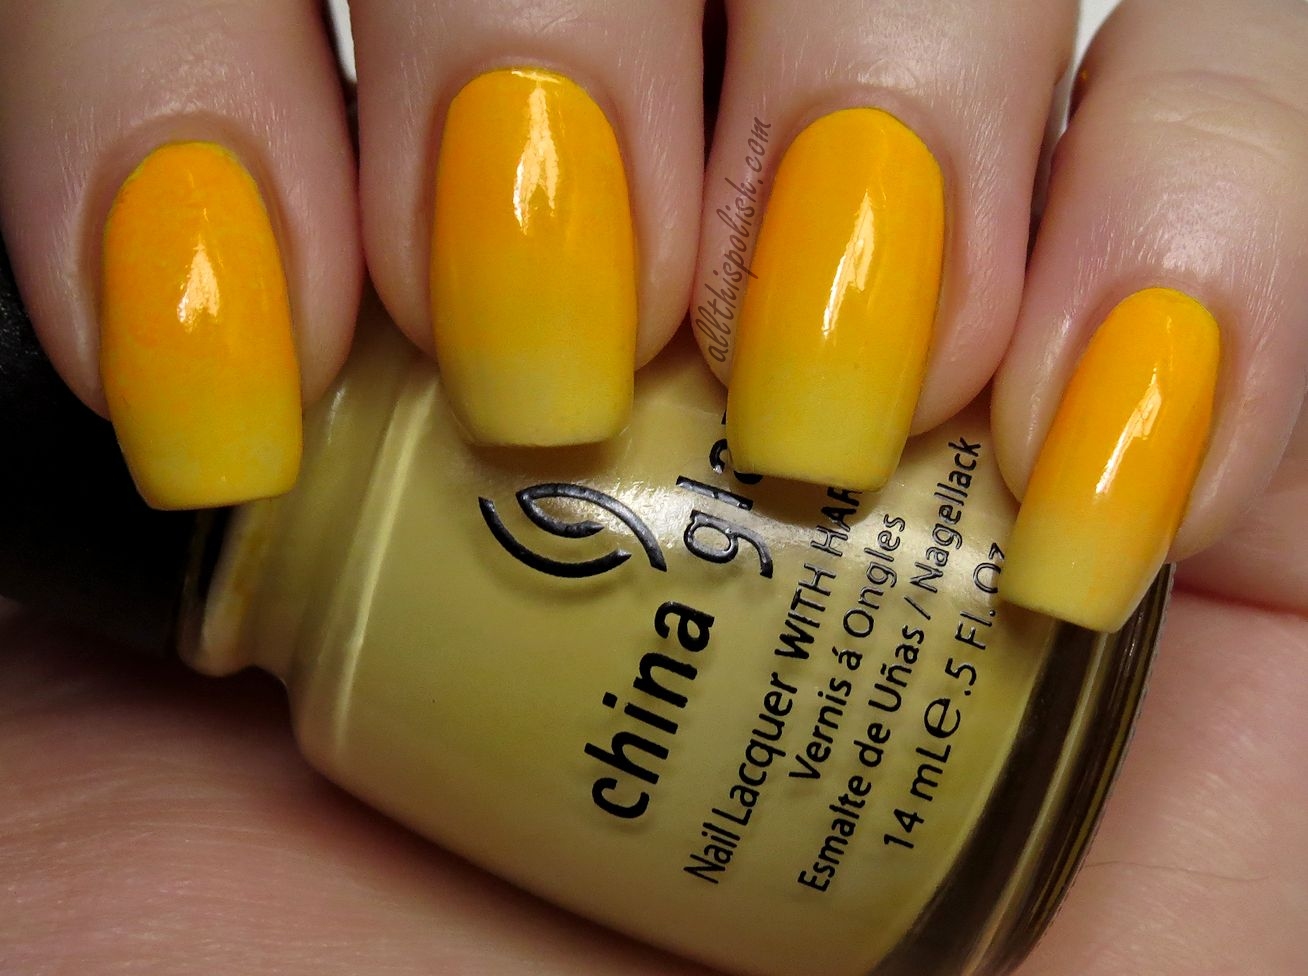
I started with a coat of China Glaze Lemon Fizz as a base. Then I sponged on Lemon Fizz and China Glaze Sun Worshipper to create a gradient, and applied some top coat to smooth it out.
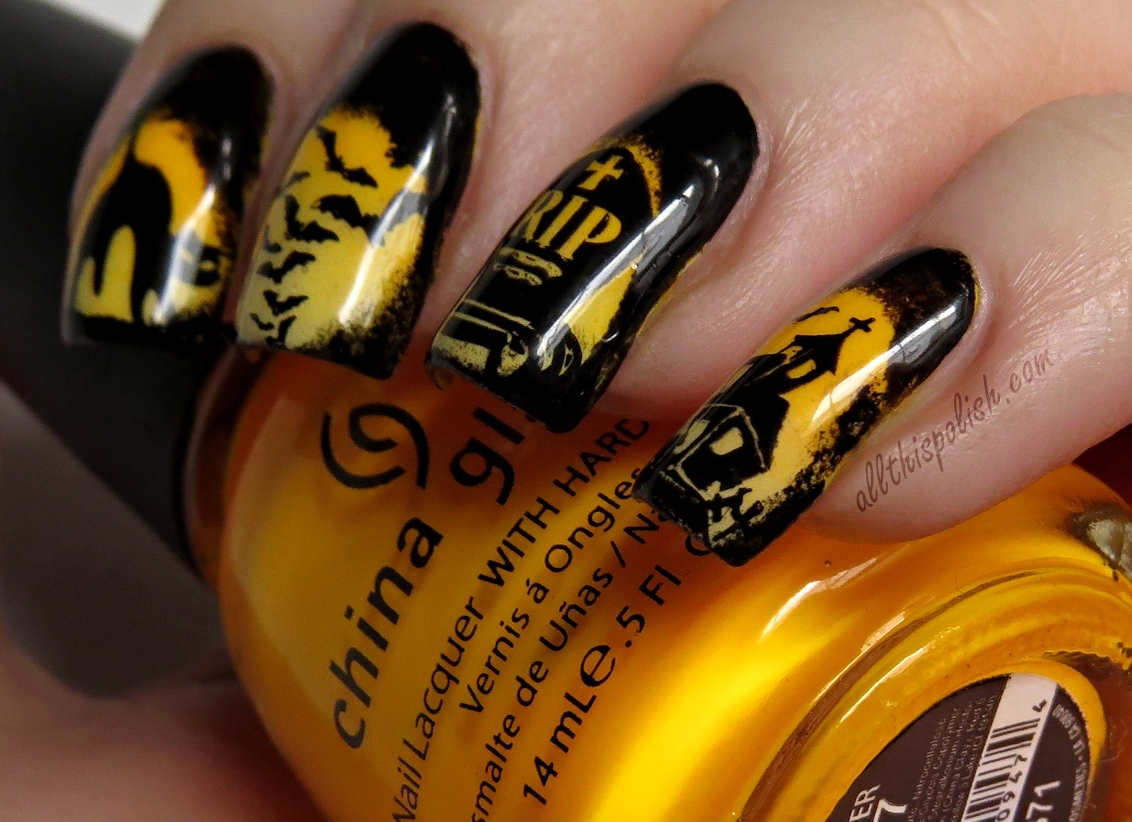
Before stamping, I also applied one coat of China Glaze Ghoulish Glow. I've had it for so long and I kept forgetting to use it every Halloween. This seemed like a perfect design to finally wear it. For the stamping, I used designs from the following plates:
Thumb - jack o'lanterns from Bundle Monster BM-H06
Index - black cat from Bundle Monster BM-H08
Middle - bats from Winstonia W116
Ring - tombstone from Bundle Monster BM-H08
Pinkie - spooky church from Bundle Monster BM-305
My thumb is a nub again by the way. Broken off in its prime. But I wasn't in the mood to cut down all my other nails just because my thumb decided not to cooperate with the rest of my hand.
All of the designs were stamped using Konad Special Polish in black. Then I cut a narrow strip off of a makeup wedge and used it to sponge on Sinful Colors Black Expressionism around the designs. I was a bit on the fence about the final look until I added top coat. The top coat really made it come to life. It turned out almost exactly how I had originally imagined it in my mind.
And after some trial and error with my camera, I even managed to get a semi-decent picture of it glowing in the dark!
Definitely one of my favorite Halloween designs that I've ever done. And not as hard to do as it might look. Which is a good thing since my mom decided she wanted me to repeat it on her nails a few nights later, lol. Happy Halloween!!!
I started with a coat of China Glaze Lemon Fizz as a base. Then I sponged on Lemon Fizz and China Glaze Sun Worshipper to create a gradient, and applied some top coat to smooth it out.
Before stamping, I also applied one coat of China Glaze Ghoulish Glow. I've had it for so long and I kept forgetting to use it every Halloween. This seemed like a perfect design to finally wear it. For the stamping, I used designs from the following plates:
Thumb - jack o'lanterns from Bundle Monster BM-H06
Index - black cat from Bundle Monster BM-H08
Middle - bats from Winstonia W116
Ring - tombstone from Bundle Monster BM-H08
Pinkie - spooky church from Bundle Monster BM-305
My thumb is a nub again by the way. Broken off in its prime. But I wasn't in the mood to cut down all my other nails just because my thumb decided not to cooperate with the rest of my hand.
All of the designs were stamped using Konad Special Polish in black. Then I cut a narrow strip off of a makeup wedge and used it to sponge on Sinful Colors Black Expressionism around the designs. I was a bit on the fence about the final look until I added top coat. The top coat really made it come to life. It turned out almost exactly how I had originally imagined it in my mind.
And after some trial and error with my camera, I even managed to get a semi-decent picture of it glowing in the dark!
Definitely one of my favorite Halloween designs that I've ever done. And not as hard to do as it might look. Which is a good thing since my mom decided she wanted me to repeat it on her nails a few nights later, lol. Happy Halloween!!!
Thursday, July 4, 2013
July 4th - Stars and Stripes!
Happy 4th of July! I had some more elaborate plans in my head, combining stamping and striping and gradients and um, ya...just a mishmash of everything really. But I usually like to try to pull off more complicated nail art on the weekends, since I have more time in case I screw something up (which is pretty much bound to happen at least once if not on several attempts). I didn't get a chance to do my July 4th manicure until Tuesday though, so I decided to keep it simple this year and stick with just stamping. And I'm glad I did because I think it turned out to be my favorite July 4th manicure ever.
I started out with 3 coats of China Glaze White On White. The stamp designs are both from
Winstonia plate W107. I stamped using Konad Special Polishes in blue and in red, then top coated with Seche Vite. I stamped the blue stars design on my thumb as well, but earlier in the week I somehow managed to snap off the entire free edge of the nail...whomp, whomp. The nail is so short that my thumb now basically bares a striking resemblance to my big toe. So ya...I'll spare you from having to see that!
Happy Independence Day! Have a safe July 4th!!!
I started out with 3 coats of China Glaze White On White. The stamp designs are both from
Winstonia plate W107. I stamped using Konad Special Polishes in blue and in red, then top coated with Seche Vite. I stamped the blue stars design on my thumb as well, but earlier in the week I somehow managed to snap off the entire free edge of the nail...whomp, whomp. The nail is so short that my thumb now basically bares a striking resemblance to my big toe. So ya...I'll spare you from having to see that!
Happy Independence Day! Have a safe July 4th!!!
Subscribe to:
Posts (Atom)