Showing posts with label gradient. Show all posts

Monday, July 28, 2014

ModCloth Nail Klub Nail Art Challenge

I was pleasantly surprised when I received an email last Wednesday from ModCloth, asking me to participate in their Nail Klub nail art challenge.  The challenge is to create a nail art look inspired by one of their many dresses.  One of their many, many, many dresses.  So many dresses!  It took me a while to narrow it down.  I started a Pinterest board just to try to keep track of all the ones that sparked an idea for nail art.  In the end though, I kept coming back to a dress called In the Key of Chic Dress in Polka Dots.


To mimic the design of the dress, I started out with 2 coats of Milani White On The Spot.  Once dry, I sponged a gradient onto Bundle Monster plate BM-018, using OPI Red Hot Rio, OPI I Just Can't Cope-acabana, and OPI Ogre-The-Top Blue, which I then scraped and stamped onto my nails.  One of the things I really loved about this dress was the way the colors were blended throughout the dots.  In the smaller thumbnail image, it looks like just solid dots of red, yellow, and blue.  But if you view the enlarged photo of the dress on the ModCloth site, you can see that the colors sometimes mix with each other, creating some dots with streaks of several colors and even blending to create some orange and green tones.


My original plan for this whole design was actually to start off with a gradient base, rather than white.  Then stamp on white polish with a design from BM-423, which would leave dots of the gradient underneath peeking through.  The gradient itself was looking pretty awesome.  But with the stamp applied, not so much.  The dots just didn't pop on the nail the way they did on the dress and the white borders were too thick.  So then I decided to reverse it and stamp with a gradient instead.  I've stamped with multiple colors at once before, and ended up with some blending in the final result.  But I wanted to make sure I'd get much more of a gradient effect this time.  So rather than just placing blobs of polish next to each other on the plate and hoping they would blend a little when scraped, I sponged the gradient onto the plate just like I would onto my nails.  And I was extremely happy with the results!


I repeated the stamp on all my nails and then top coated with Seche Vite to seal it in.


Ideally, I would have loved to have added some type of bright blue accent for the blue bow wrapped around the waist of the dress.  And believe me I tried.  Multiple times.  In the process, I confirmed that I can't free hand a bow to save my life, lol.  I tried stamping a few different bow designs, but none of them looked right or were just not opaque enough.  I even went so far as to attempt both a ruffian design and framed nails to try and incorporate the bright blue of the bow.  When all that fell flat, I decided to just stick with what worked.  So I finally left my little polka dots alone, and I think they look great all by themselves.  There's 52 other dresses from ModCloth still on my Pinterest board (now you can understand my need to organize them!), so if I'm ever stuck for nail art inspiration in the future, that'll probably be the first place I turn to.

Friday, July 4, 2014

Stars and Stripes - Happy 4th of July!

Happy July 4th everyone!  Leading up to July 4th this year, I took part in an Independence Day themed swap on Facebook and my awesome swap partner, Cari, sent me a box full of Salon Perfect goodies and some candy.  So after I came down from my sugar high, lol, I got to work on putting together a look for July 4th.  Using a bunch of the items she sent me, here's what I came up with this year.


For my thumb and index nail, I started with Salon Perfect Blue Ribbon.  This was my first experience trying any Salon Perfect polishes and I was pretty happy to see I only needed 2 coats of Blue Ribbon for decent coverage.  The star designs are from a Salon Perfect decal kit that Cari also included in the swap package.  I topped these blue nails with 2 coats of Seche Vite, just to try and even out the edges of the decals.


For the red and white stripes on the rest of my nails, I decided to do a reciprocal gradient instead of regular stripes.  I started with one coat of Salon Perfect Sugar Cube, then sponged on a red and white gradient using Sugar Cube and Salon Perfect Paint The Town Red.  Once that dried, I placed 3 strips of striping tape onto each nail, then redid the gradient with the colors on the opposite ends as the original gradient and quickly removed the striping tape.  I finished off these 3 nails with just one coat of Seche Vite.  The gradient isn't quite as smooth as I would have liked.  But I didn't want to blend the red and white much more because I was hoping to minimize the amount of pink through the center of the gradient.


I've been wearing this all week and it's starting to show a little wear in real life compared to the pictures.  Since July 4th is a Friday this year, there is sure to be some celebrating all weekend long, so I may take this off and do another July 4th manicure sometime today.  Have a fun and safe holiday everyone.  'Murica!

Tuesday, March 4, 2014

Mantis Shrimp and Zoya Mitzi Glitter Gradient

Here I go with Zoya Mitzi again.  I love green in general, it's my favorite color.  But I really adore obnoxious shades of green like this.  I realized this even more the other day as I looked around the room and realized that my cell phone case, my laptop mouse and even my hair brush are all this exact same color green.   As usual, Mitzi was streaky, so it took 3 coats to get full, even coverage.  The reason for pulling Mitzi out of the stash again, despite her streaky ways, was that I thought it would make a great base for a glitter polish called Mantis Shrimp.


Mantis Shrimp is a glitter combo that a friend in a Facebook group made for herself.  We all went crazy over it, for good reason, and Sarah agreed to make a few more bottles for those in the group who were interested.  If you're not familiar with what a mantis shrimp is, check out the inspiration behind the polish on The Oatmeal.  And while you're at it, check out Sarah's own Facebook page, My Lacquer Family.  The glitter pairings that she comes up with are just brilliant.


I thought a glitter gradient would be a fun way to layer Mantis Shrimp over Mitzi.  I also needed an excuse to practice the technique because my previous attempts at glitter gradients have been just all sorts of fail.  But this one turned out awesome!  I was so happy with the final results.


I have seen many posts by other bloggers on glitter gradients, all explaining generally the same technique.  But the one that seemed to help me the most is a post from just a few weeks back by Lucy's Stash, which includes a video tutorial.  The video is actually an update to another tutorial she posted a little over a year ago.  I highly recommend checking out both videos.  They definitely helped me.


Thursday, October 31, 2013

Halloween 2013 - Spooky Silhouettes

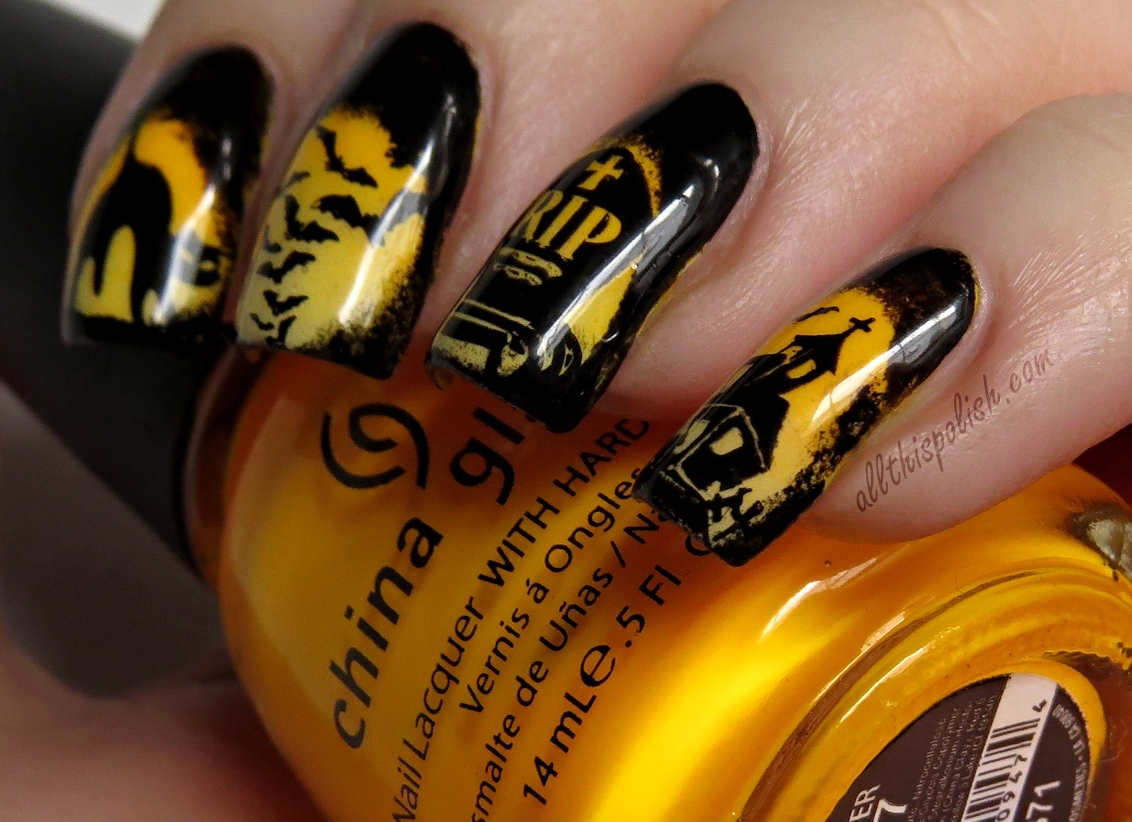
I wanted to do something kind of cool for Halloween this year, because I pretty much flaked on Halloween last year.  I was coming up short on ideas though, so I did a simple Google Images search on "Halloween" to see if I could get inspired.  A bunch of the results were wallpapers or clip art with some type of silhouettes in front of a roundish, full moon looking orange glow.  I decided to try and translate that look to my nails and here's what I came up with!


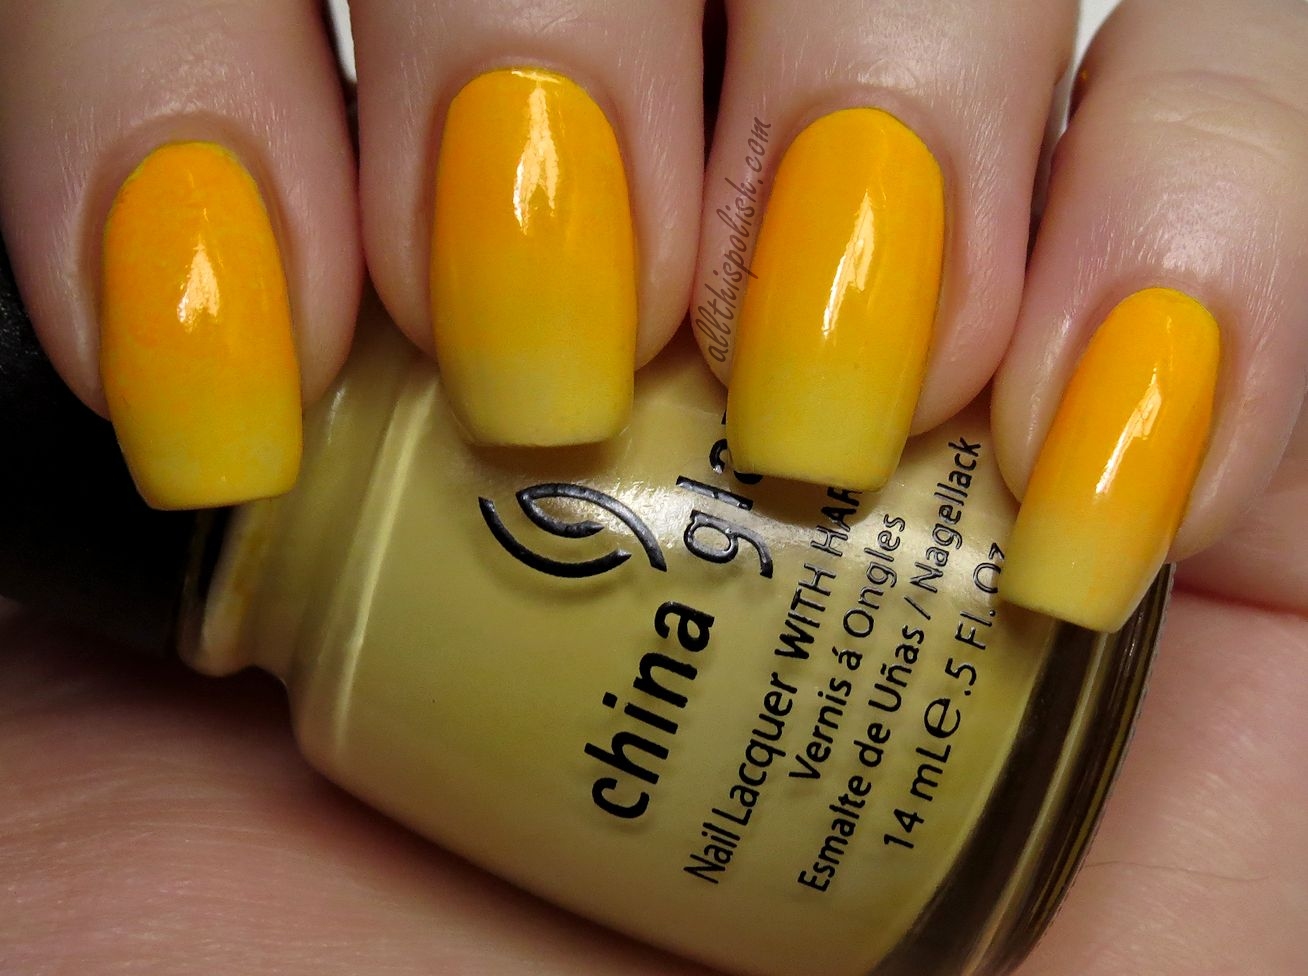
I started with a coat of China Glaze Lemon Fizz as a base.  Then I sponged on Lemon Fizz and China Glaze Sun Worshipper to create a gradient, and applied some top coat to smooth it out.


Before stamping, I also applied one coat of China Glaze Ghoulish Glow.  I've had it for so long and I kept forgetting to use it every Halloween.  This seemed like a perfect design to finally wear it.  For the stamping, I used designs from the following plates:

Thumb - jack o'lanterns from Bundle Monster BM-H06
Index - black cat from Bundle Monster BM-H08
Middle - bats from Winstonia W116
Ring - tombstone from Bundle Monster BM-H08
Pinkie - spooky church from Bundle Monster BM-305


My thumb is a nub again by the way.  Broken off in its prime.  But I wasn't in the mood to cut down all my other nails just because my thumb decided not to cooperate with the rest of my hand.


All of the designs were stamped using Konad Special Polish in black.  Then I cut a narrow strip off of a makeup wedge and used it to sponge on Sinful Colors Black Expressionism around the designs.  I was a bit on the fence about the final look until I added top coat.  The top coat really made it come to life.  It turned out almost exactly how I had originally imagined it in my mind.


And after some trial and error with my camera, I even managed to get a semi-decent picture of it glowing in the dark!


Definitely one of my favorite Halloween designs that I've ever done.  And not as hard to do as it might look.  Which is a good thing since my mom decided she wanted me to repeat it on her nails a few nights later, lol.  Happy Halloween!!!

Saturday, March 2, 2013

Reciprocal Gradient

Sometimes I see an idea and I think, "I have to try this" but then I just never seem to get around to it.  This time though, I needed to try it immediately!  I first saw an example of this manicure just a few days ago on Facebook.  It was a post from My Simple Little Pleasures for her latest video tutorial.  She had seen Wacky Laki's Valentine's Day Gradient post (who had originally been inspired by a post from October by Globe & Nail).  I've been slacking lately on reading other blogs so I totally missed it when Wacky Laki posted her Valentine's Day gradient, so I'm so happy that I caught Colette's Facebook post in order to discover this look.  All three of these ladies did a fantastic job and it just made me want to try this manicure ASAP.


Colette's video does a great job of explaining how to do this, and Globe & Nail also posted a tutorial on her blog to correspond with her original post, so I don't really need to go into great detail myself on how this was done.  The basics are that I started with one coat of Zoya Kristen as a base for my gradient.  Kristen applied great, but on its own, I definitely would have needed a second coat.  Using a makeup wedge/sponge, I sponged on my gradient using Zoya Kristen, Zoya Skylar and Zoya Cynthia, with Cynthia at my cuticles, Skylar in the middle and Kristen at the tips of my nails.  I've tried a few different techniques for gradients and they all seem to work just as well for me.  For this particular manicure though, I used the same technique as Colette did her in YouTube video and applied all three polishes directly to the sponge.


I applied a second coat of sponging to the gradient to make it more opaque then top coated with Seche Vite.  Once it was completely dry, I applied three pieces of striping tape to each nail and repeated the gradient (two coats) but with Kristen at the cuticle and Cynthia at the tip.  Then came the moment of truth, when it was time to peel off the striping tape.  I was a bit worried that some how I had managed to screw it up.  But I peeled off the striping tape and it had worked and it looked awesome!  I was so thrilled.  I cleaned up any polish that had gotten on my skin from sponging and applied top coat to finish it off.


This did take some time, probably about an hour and a half or so, plus clean up, but totally worth it.  I didn't tape off my nails or apply Vaseline or chap stick so clean up took a little while.  But then again, I'm weird and I sort of actually enjoy clean up on my manicures.  It's kind of calming or relaxing for me in a weird way.  I just use pure acetone and a small chisel tip blender art brush I picked up at Michael's.  And luckily, I didn't have any major problems with any of the Zoya polishes staining my skin.


I loved this look so much, I can't wait to try it again.  I might just try it with shades of green since we're into March now.  It's definitely a bit time consuming but still super easy and so worth the time and effort.  Be sure to check out the other ladies I linked earlier!  I've followed My Simple Little Pleasures and Wacky Laki for a while now.  Globe & Nail is fairly new to me, but she is quickly becoming one of my favorite bloggers.  (Example...see Hunt...whoa!  The only thing I love more than plaid is camo and this absolutely kicks ass!)

Sunday, January 27, 2013

Just Spotted the Lizard Gradient

OPI Just Spotted the Lizard is one of my many, many, oh so many untrieds.  I put it on not really having a plan, but knowing I wanted to do something with it besides leave it plain.  I decided to try out another gradient, since I could use the practice, and then stamped a simple Bundle Monster design over the whole thing.
 

For the gradient, I sponged on Finger Paints Black Expressionalism, then added some top coat to smooth everything out.  The stamp is from Bundle Monster plate BM-316, using Konad Special Polish in black, then some more top coat.  I wanted something simple, that would fade into the black tips and I didn't want to cover too much of Just Spotted the Lizard with the design.


Short post today, but there's not much else to say.  This was a super simple design to do but it also turned out to be one of my recent favorites.  And Just Spotted the Lizard is pretty kick ass to begin with.  Might have to grab myself a back up of this one if I ever run across it again.

Monday, January 14, 2013

Blue Gradient Snowflakes

Right before Christmas, my friend Kelly from work bought me this little polish set she found at Aeropostale.  She told me, "I don't know if the polish is any good, but I saw the glitter and rhinestones and had to buy it for you."  As soon as I opened it, I knew what kind of design I was going to do to use all 4 pieces in the set.


The set came with two polishes, a dark blue shade and a light blue shade (no names on them), and it also came with two little pots.  One pot was filled with loose glitter and the other contained small rhinestones.

photo courtesy of aeropostale.com

I started with two coats of the light blue polish and then sponged on the dark blue to create a gradient.  The gradient ended up being a bit more subtle than I had expected, but that was due to the light blue polish drying a lot darker than it looked in the bottle.  I still like the way it came out though.  Then using Bundle Monster plate BM-323 and Konad Special Polish in white, I stamped on the snowflakes. To apply the glitter and rhinestones, I worked on one nail at a time.  I applied one coat of clear polish and dipped a fan brush in the glitter and lightly sprinkled the glitter over the clear polish.  I dabbed on a dot of clear polish in the middle of the two largest snowflakes and, using an orange stick, applied two rhinestones.  Then repeated the process on each nail.  The glitter was a little rough, so I applied one coat of Gelous before applying Seche Vite.


I had originally planned to stamp the pattern in the opposite direction but didn't realize until after my entire left hand was done that I had reversed it.  So I decided to turn it around for my right hand.  I honestly couldn't decide which way I liked it better though.


The Aeropostale polish, by the way, was pretty good.  It applied really well and only took a couple coats to be opaque.  This manicure lasted a full week.  I was pleasantly surprised.

LinkWithin

Related Posts Plugin for WordPress, Blogger...