Sunday, December 22, 2013

Winter Wonderland

A few weeks ago, OPI Ink & OPI Ink Suede had come up in a conversation and it reminded me that it had been a while since I'd worn any of the OPI Suede shades.  So I pulled out OPI Ink Suede from the drawer and used it as a background for a snowy, winter design.  And yes, I know it's meant to have a suede/matte finish, but I also love the way all the OPI Suedes look when top coated.  I think the way that top coat brings out the sparkle in the OPI Suede shades was perfect for this design.


I didn't want too much empty space between the snowflakes, so I first stamped a scattered sparkles design from Nailz Craze plate NC02, using Konad Special Polish in pastel blue.  For the snowflakes, I stamped with Konad Special Polish in white and used a mix of snowflakes from several different Bundle Monster plates (BM14, BM-319 and BM-H01) along with several snowflake designs from Winstonia plate W120.


When I finished stamping, I felt like it was missing something.  I ended up adding just a little bit of Sonnetarium Snowfall.  Instead of brushing the glitter over the entire nail, I used the tip of the brush to dab on just a little glitter in the spots between the snowflakes that seemed a bit bare.  Then I top coated the whole thing with Seche Vite.  


The light blue sparkles in the background didn't turn out as noticeable as I had originally thought they would, but I still loved the little touch of light blue to contrast the dark blue of the OPI Ink Suede and the bright white snowflakes.

Saturday, November 30, 2013

Falling Leaves

I tried to do some turkey nail art this past week for Thanksgiving, I really did, but I just couldn't get inspired.  I really had no clue what to put on my nails actually.  All I knew was that my bottle of Zoya Mitzi happened to be sitting out on my nightstand and I felt like I needed to use it.  After looking through my stamping plates, I decided it might make a good background for some random leaves in Autumn colors.


Zoya Mitzi is a matte finish and it seemed a bit streaky to me.  I needed 3 coats to get it perfectly even.  The leaves all came from different plates: Red Angel plates RA-118 and RA-121, and Winstonia plate W113.  Pardon the crappy cell phone picture below.  I just took this as a reference shot so that when I got around to writing this, I wouldn't have to dig out my plates again to get the numbers.  But I might as well just include it in the post.  


The polishes used for stamping were Konad Special Polishes in green, pastel orange, dark orange and dark red.  Sometimes I dropped blobs of all 4 colors onto a leaf, other times I used just 2 or 3 of the colors.  I also experimented a bit with mixing the colors with a toothpick on the plate before scraping.  But the scraping action itself would also blend the colors inside the leaf patterns.  


For placement, I just stamped the leaves randomly on each nail.  I didn't like all the open space between the leaves, so to fill it in a bit, I used a toothpick and added some dots using the same Konad polishes.  


This definitely turned out to be one of my all time favorite looks.  I wore it for the whole week, but I'm still a little sad to take it off!  

Thursday, November 14, 2013

Autumn Pumpkins

Have you ever had an idea for a design but it didn't work out the way you had wanted it to?  That's what happened with this manicure.  Except that what I thought was a problem at first, ended up making the final design even better than my original idea.


The plan was to take a design from Bundle Monster plate BM-H11 and place green polish over the leaves, two different shades of orange over the pumpkins and scrape, then stamp.  I've mixed colors when scraping on other designs, so easy, right?  Well...not so much.  At first, the colors kept mixing each time I scraped off the excess polish.  It was annoying me in the beginning, but after a few test stamps on a piece of paper, I started to like the way that each pumpkin looked a little different.  So I decided to just go with it and try it on my nails that way.


When I was stamping my right hand, I played around a bit starting in the middle of the design instead and scraping from the middle of the design outward to the edges.  It took about 2 to 3 scrapes in different directions, but it did prevent the colors from mixing so much.  But as it turned out, I really liked the pumpkins with the mixed polishes more.  The pumpkins where the polish mixed looked more natural.  They reminded me of real pumpkins that still were in the process of ripening.  Some had a few green spots, some were mostly orange and "ripe" and some were almost completely green.  I think my favorite pumpkin turned out to be one on my middle finger, which was almost all green with just a hint of orange running horizontally through the center.


It was a reminder to me that not everything has to be perfect.  I was getting frustrated in the beginning when the green was bleeding into the pumpkins each time I scraped the plate.  But the blending of the orange and green polishes is actually what made me love this manicure in the end.

For the stamping, I used Konad Special Polishes in green, dark orange and pastel orange.  The base color used for this look was Color Club Mod In Manhattan, from the Birchbox exclusive Wanderlust Collection, which I purchased this past summer.  I have a design from back in September, using the whole collection, that I have yet to post.  But you can expect to see that uploaded soon, along with a few other designs from Sept/Oct that I had skipped over.

Thursday, October 31, 2013

Halloween 2013 - Spooky Silhouettes

I wanted to do something kind of cool for Halloween this year, because I pretty much flaked on Halloween last year.  I was coming up short on ideas though, so I did a simple Google Images search on "Halloween" to see if I could get inspired.  A bunch of the results were wallpapers or clip art with some type of silhouettes in front of a roundish, full moon looking orange glow.  I decided to try and translate that look to my nails and here's what I came up with!


I started with a coat of China Glaze Lemon Fizz as a base.  Then I sponged on Lemon Fizz and China Glaze Sun Worshipper to create a gradient, and applied some top coat to smooth it out.


Before stamping, I also applied one coat of China Glaze Ghoulish Glow.  I've had it for so long and I kept forgetting to use it every Halloween.  This seemed like a perfect design to finally wear it.  For the stamping, I used designs from the following plates:

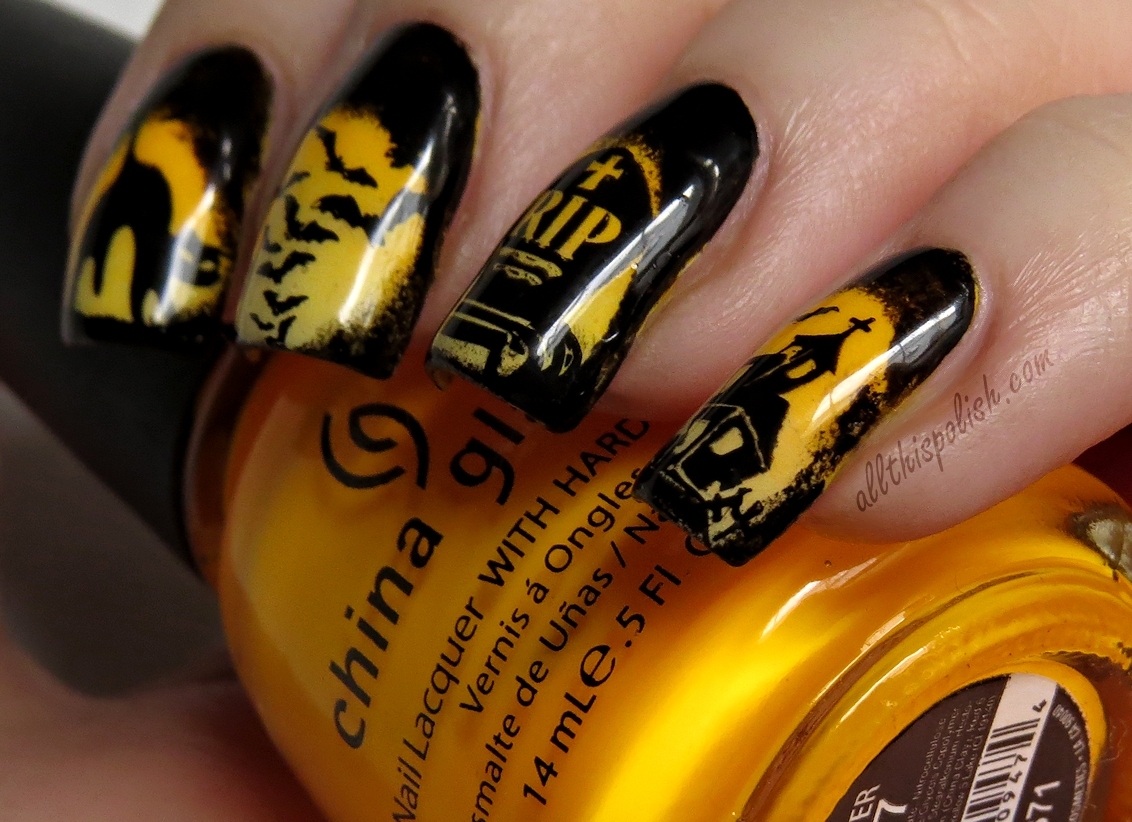
Thumb - jack o'lanterns from Bundle Monster BM-H06
Index - black cat from Bundle Monster BM-H08
Middle - bats from Winstonia W116
Ring - tombstone from Bundle Monster BM-H08
Pinkie - spooky church from Bundle Monster BM-305


My thumb is a nub again by the way.  Broken off in its prime.  But I wasn't in the mood to cut down all my other nails just because my thumb decided not to cooperate with the rest of my hand.


All of the designs were stamped using Konad Special Polish in black.  Then I cut a narrow strip off of a makeup wedge and used it to sponge on Sinful Colors Black Expressionism around the designs.  I was a bit on the fence about the final look until I added top coat.  The top coat really made it come to life.  It turned out almost exactly how I had originally imagined it in my mind.


And after some trial and error with my camera, I even managed to get a semi-decent picture of it glowing in the dark!


Definitely one of my favorite Halloween designs that I've ever done.  And not as hard to do as it might look.  Which is a good thing since my mom decided she wanted me to repeat it on her nails a few nights later, lol.  Happy Halloween!!!

Tuesday, October 22, 2013

KBShimmer Swatch Spam

Press Sample

Along with the new KBShimmer polishes I was sent to review back in August, I also received several mini bottles of core collection colors.  I've had these swatched since August but just never got around to posting them.  Bad Sarah!  However, if you follow KBShimmer on Facebook, then you may have seen the new Trick or Treat promotion that Christy is running.  If you happened to have missed the announcement, check out the details here.  With the new promotion running, this seems like a great time to finally get these swatches up!  


Be prepared, this is going to be a bit picture heavy.  Check out all the swatches after the break.

Sunday, October 6, 2013

Zoya Saran Wrap Nails

Welp, looks like I've got some catching up to do.  Lots of manicures have come and gone since my last post.  My nails grew out, then a few broke so they were down to nubs, and then they grew out again, lol.  I'm going to try, more or less, to go in order with these.  Here's one manicure I wore back in the beginning of August, using Zoya Charisma and Zoya Rocky.  I actually wore this the week right before the KBShimmer swatches in my previous two posts.  This was my first ever attempt at saran wrap nails.


I started out with 2 coats of Zoya Charisma, which is a neon magenta/purple shade.  Application was really smooth and Charisma dried to a matte finish.  Once that was completely dry, I followed with the typical saran wrap nail steps using Zoya Rocky, a wonderful dusty light blue.


Working one nail at a time, I applied a thick coat of Rocky and then took a small piece of plastic wrap balled up and dabbed it randomly on the nail, slowly revealing bits of Charisma underneath.


I think it went pretty smoothly, being my first time trying this technique.  There were a few times that I thought I took too much polish off, but I just applied a fresh coat of Rocky and dabbed again with a new piece of plastic wrap.  After waiting for everything to dry, I applied top coat.


I was really happy with the final look.  Charisma and Rocky worked really well together.  I think this is a fairly easy technique to do and would work well on those days when you just aren't sure what type of manicure you're in the mood to do.

Thursday, August 15, 2013

KBShimmer Vicious Circles

Press Sample

Today, the KBShimmer 2013 Fall Collection was officially announced!  Head over to Christy's blog to view the full announcement.  The new line won't be released until September 1st, but here are some swatches of one of the new polishes, Vicious Circles, which Christy was nice enough to send to me to preview for everyone.


Vicious Circles is described as "a blood red jelly loaded with silver holographic circles in two sizes, silver holographic hex glitters and holographic silver micro slices."  All pictures show three coats, which I followed by applying one coat of Gelous and one coat of Seche Vite.


I love the way the holographic circles look suspended in the jelly polish.  You will love this even if you're not a fan of bar glitter.  The micro slices are a very subtle touch to the overall look.  There is a generous amount of glitter in the polish, which was super easy to apply and the glitter spread evenly over the nail.  This shade, along with the rest of the new fall line will be available for purchase starting September 1st at the KBShimmer site.

*Polish sent for honest review.  Review contains only my personal opinions.*

LinkWithin

Related Posts Plugin for WordPress, Blogger...